The Social Media Marketing Strategy That Smart Marketer Used to Grow a $155 Million Brand.
So, you created some content. Nice!
You spent precious time and resources coming up with content ideas, paying someone to make it for you (or making it yourself), and putting it out into the world to connect with your audience and attract people to your brand.
The problem is that your content isn’t getting enough eyeballs. It’s not driving the level of clicks and engagement you’d hoped for, and now you’re worried that all your hard work is going to waste.
I’ve been there and it hurts, but don’t worry — you’re in the right place.
In this article, you will learn how to use content to grow any brand regardless of its size or business model.
This is the same Social Media Marketing Strategy I used to build a $155 million Shopify store (BOOM! By Cindy Joseph) from the ground up, and it can help make sure your hard work translates into real value for your audience and real dollars for you.
Why “Content Amplification” is the Secret to a Profitable, Sustainable Social Media Marketing Strategy.
In this chapter, you will learn the key to a profitable, sustainable social media marketing strategy.
I’ll explain what “Content Amplification” is, how it compares to organic marketing and traditional paid advertising, and the platform you should use to start leveraging it for your brand.
Organic Marketing vs. Content Amplification: What’s the Best Strategy for Growing a Blog?
It doesn’t matter whether creating content is your passion or if you simply use content to promote a product or service.
If you want to get more eyeballs on your content, then you need to:
Get new fans to consume your content, and…
Get your current fans to consume more of your content. (This one is often ignored, but as you’ll see it’s incredibly important.)
To accomplish these goals, you have two main strategies at your disposal:
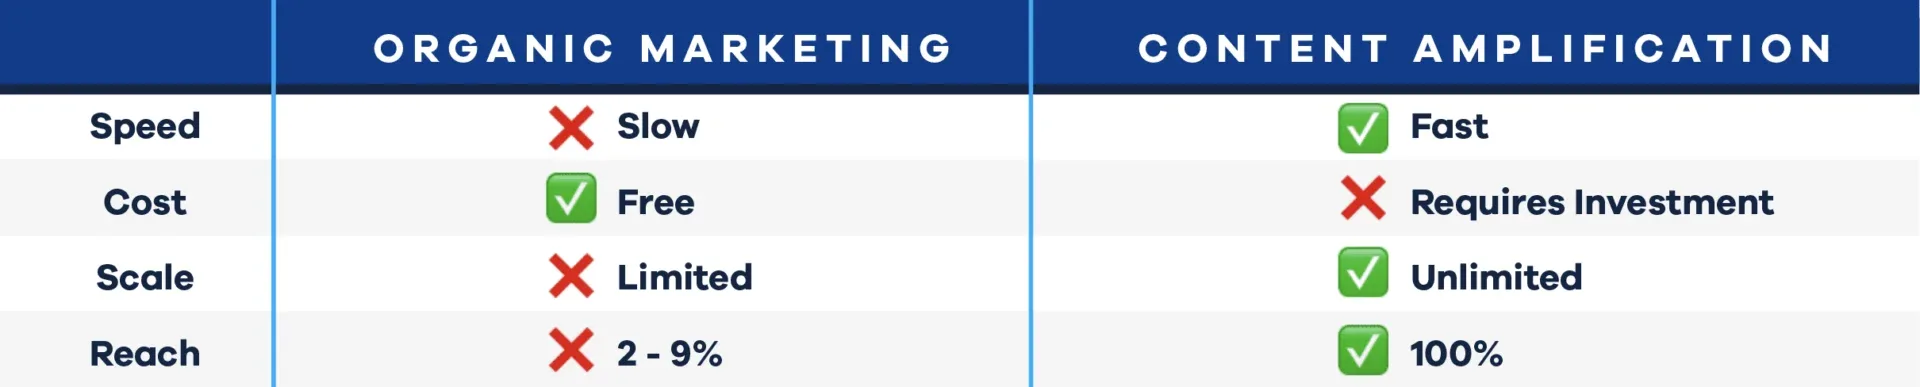
1. Organic Marketing: These are all the ways of promoting your content that don’t cost money.
This includes social media posts, search engine optimization, content swaps, stuff like that.
Source: Ignite Social Media
The obvious advantage of organic marketing is that it’s basically free. The drawbacks are that it takes a long time, it’s hard to reach new people, and surprisingly, it’s even hard to reach your followers.
In the past few years, organic reach has dropped significantly on most social platforms. It’s down to just 2% on Facebook and 9% on Instagram, meaning that even after you go through the trouble of building an audience, the content you post still won’t reach 92–98% of them!
If this is all you’ve done so far, don’t worry. It’s a good place to start.
Organic marketing is something you should absolutely be doing as a long-term investment, but you might not see quick and significant results from this strategy.
2. Content Amplification: This is where you pay an advertising platform — like Facebook, Instagram or YouTube — to show your content to its users.
What’s great about this option is that you can get your content in front of a lot of new people quickly, consistently, and at scale.
You can reach 1,000,000 people this week, 1,000,000 more next week, and on and on for years. (Try accomplishing that with organic marketing!)
Just as importantly, you can use Content Amplification to help make sure all of your followers see your posts. These are the people who have consumed your content on your blog or social media profiles, have visited your website, etc.
These followers are incredibly valuable to your brand, and while you can only reach about 2–8% of them organically, you can amplify your content to reach your entire audience and keep them engaged.
The only drawback of Content Amplification is, of course, that it costs money — but it’s well worth it. As I’m going to explain, content is an essential part of growing any sustainable business, and it can deliver a high ROI on your investment.
What is the Difference Between Content Amplification and Traditional Advertising?
Okay, you might be thinking, “Hm, so I can pay to get my message in front of people… That sounds a lot like traditional advertising!”
But there are actually important differences between paid advertising and content amplification, namely:
The type of post being promoted
The strategy behind it
What is Traditional Advertising?
While both of these strategies use a platform like Facebook to amplify their message, traditional ads promote 1) an offer (i.e., a product or service) or 2) a piece of gated content in exchange for an email address.
The nature of the interaction with the customer is an exchange — what I have for what you have.
What is Content Amplification?
Content Amplification, on the other hand, is promoting a piece of free content and asking for nothing in return.
But you do get something in return — 4 things, in fact:
1. You drive immediate conversions.
Yes, if you do this correctly, content posts can drive sales or opt-ins even without making an offer. Last year, my brand generated $2.4 million in direct sales from social media alone.
Here’s an example.
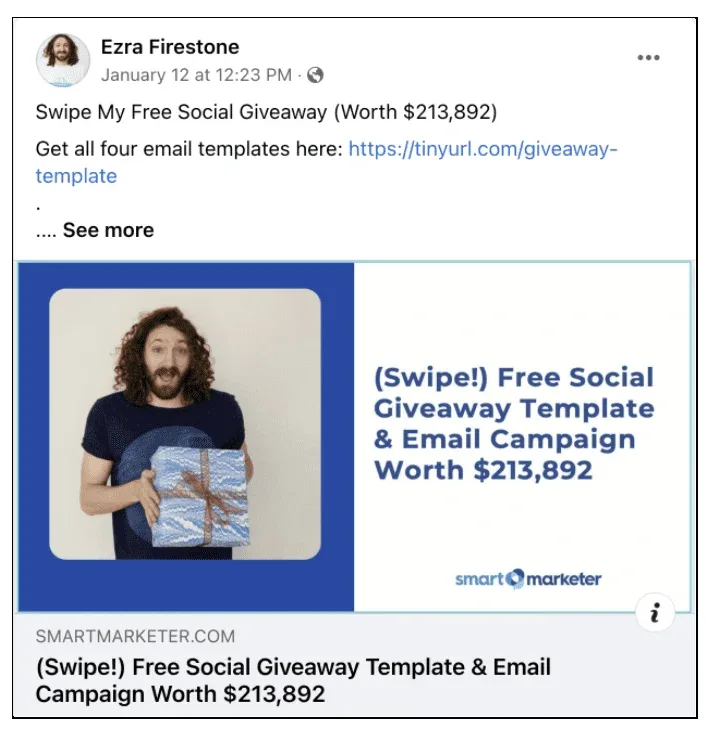
This is a Facebook post for a blog article we wrote sharing a successful email campaign:
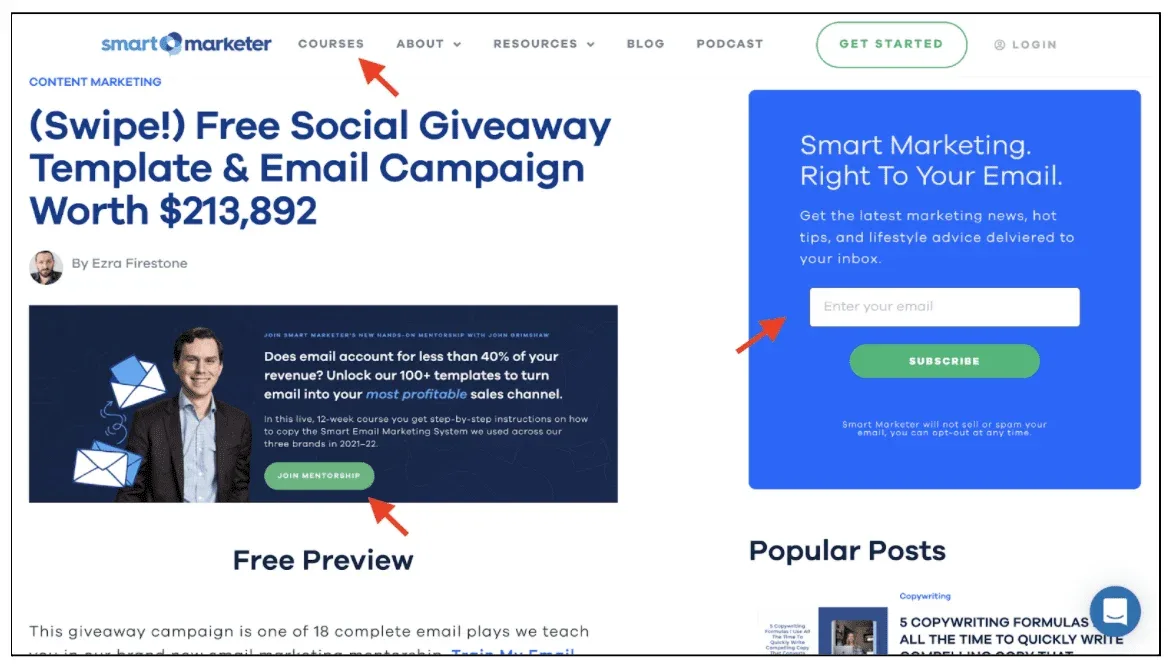
And here’s the landing page for that blog article:
This page delivers on the promise of free content while also having several calls to action, including a pitch for a relevant offer (our new Email Mentorship), a link to our courses in the header, and an opt-in box to subscribe to our blog.
Everything you post should create interest in your products, even if it’s indirectly.
2. You develop long-term relationships.
I believe that a modern brand is simply an ongoing conversation with a group of people about something that interests them. That’s it.
And while traditional ads do little to develop relationships, by consistently posting content you gain a voice in the conversation and place in people’s lives.
This is how you turn strangers into loyal fans, and it’s how I built an audience of 360K Facebook likes and 700K email subscribers.
3. You set yourself apart from the competition.
The more crowded the marketplace gets, the harder it becomes to offer a product or service that’s truly unique.
Most competitors can match you on price, shipping and features, but if you use content to establish your authority in the marketplace and develop a relationship with your community, that’s something they can’t copy!
4. You can monetize your audience.
While content posts do drive quick conversions, that’s not the main goal of a content marketing strategy.
The big payoff comes after you generate a group of loyal fans when you monetize these warm audiences through promotions, ad space, affiliate offers, etc.
As I will show you later, content is a key part of the marketing strategy I used to grow a $125 million online brand.
Now that we understand the differences between these two strategies, let’s move on to the best platform to use for Content Amplification.
Why is Facebook the Best Platform for Using Content Amplification to Grow Your Brand?
While it may not be the best platform for organic reach, Facebook is still far and away the best tool for using Content Amplification to grow a brand. Why?
1. Facebook has A LOT of users.
In Q3 of 2021, Facebook (now Meta) posted 2.89 billion monthly active users, with 3.5 billion unique users across their 4 core products: Facebook, Instagram, WhatsApp, Messenger. Now that’s scale.
So not only are your current fans on there, but an incredible number of potential new engagers are, too.
Different people respond to different content types. Some like to read while others prefer to watch or listen.
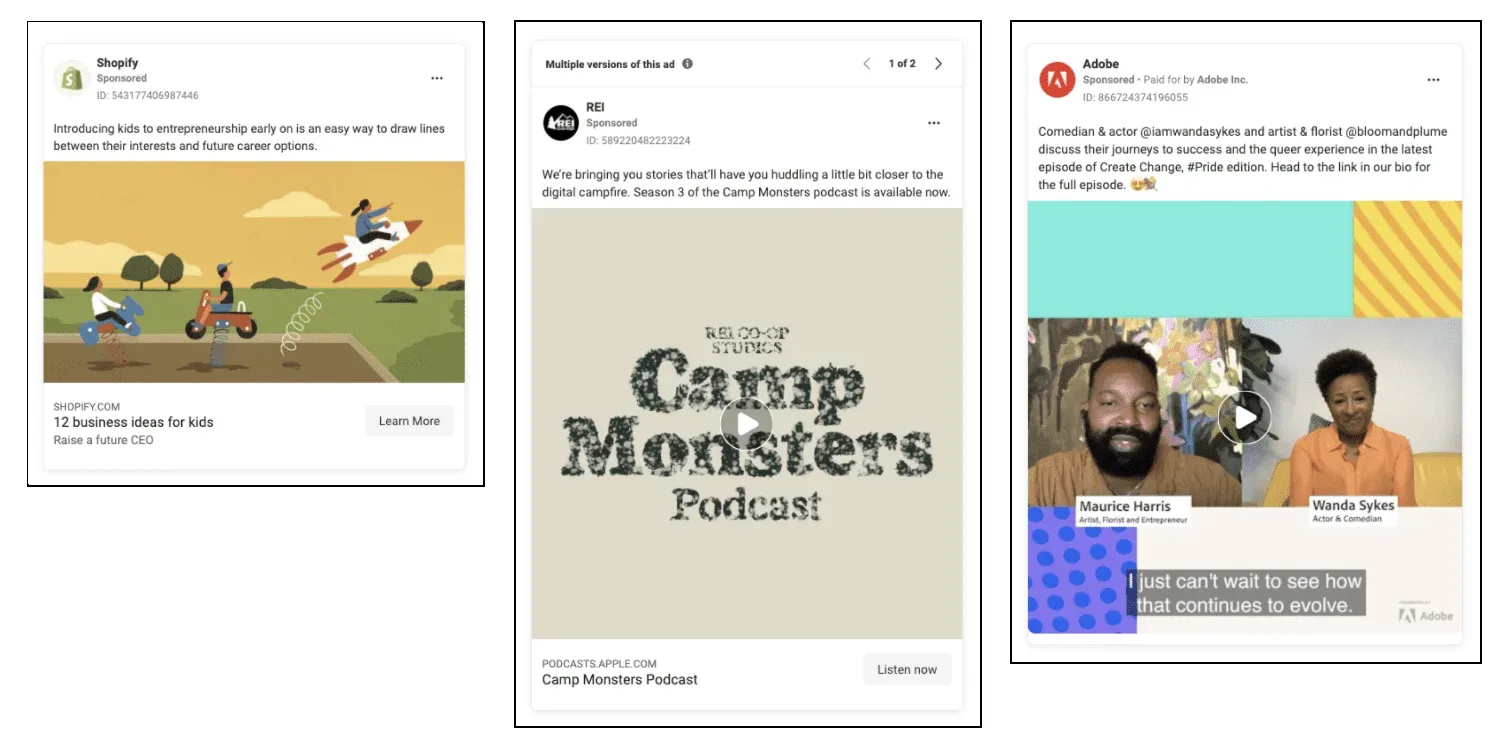
Fortunately, Facebook is optimized for just about every type of content, including:
Articles (1)
Podcasts (2)
Long-form Videos (3)
Meanwhile, a platform like YouTube specializes in videos but doesn’t work well for static images, while Google is great with static images but doesn’t work well with video.
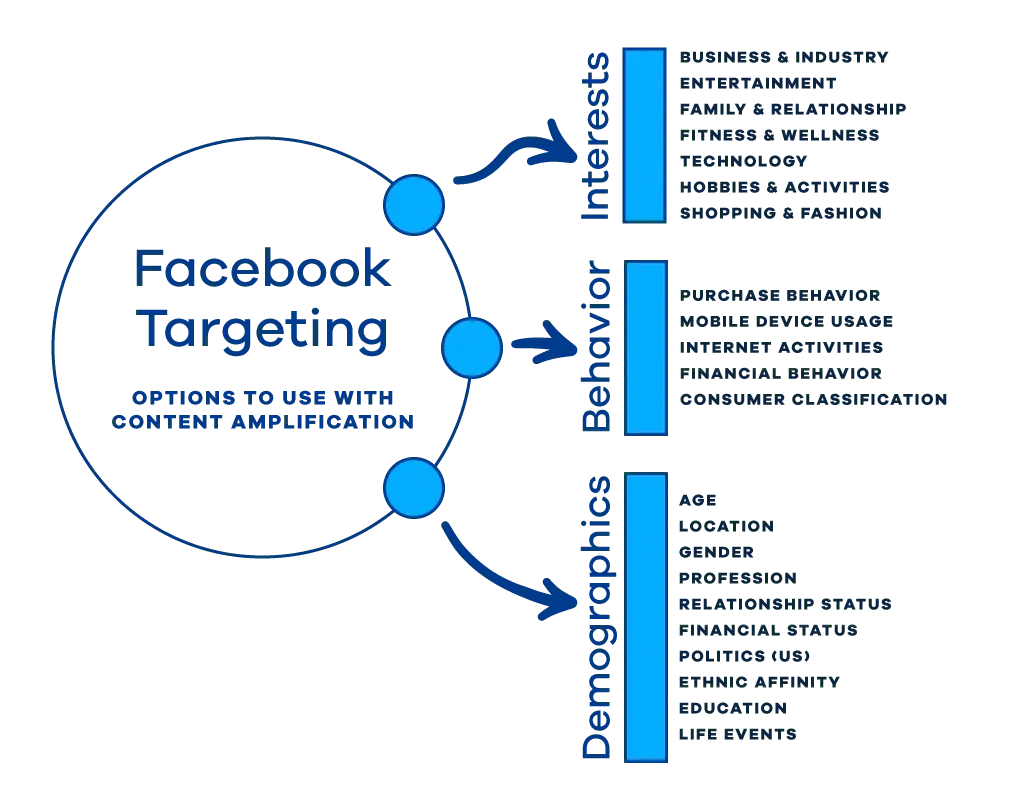
3. Facebook has the MOST targeting options.
What’s the use of having access to 3 billion people if you can’t find the right ones, am I right? It’d be like looking for a needle in a haystack.
Don’t worry — that’s where targeting comes in.
Targeting helps you get your posts in front of the people most likely to enjoy them, and no platform has more targeting options than Facebook.
Facebook collects hundreds, even thousands of data points on its users — including their interests, behavior and demographics:
Or how about this example: if you’re looking for someone to watch your bicycle video, would you rather:
Pick a random person out of a crowd and see if they’re interested in bikes?
Or…
Pick a person who you know owns a bike, buys bike merchandise and watches other bike videos?
It’s an easy decision.
And in Part 2 of this article (below), I’m going to show you how to build the Facebook audiences for all your best prospects — including your past buyers, email subscribers, followers on Facebook or Instagram, and anyone Facebook thinks is similar to these people.
If you’re serious about getting more people to consume your content so you can reap the rewards of all your hard work, then keep reading!
Chapter 2
Using Facebook for Content Amplification: How to Get Posts in Front of Your Buyers, Subscribers, Fans & Ideal Prospects
Now that we understand the fundamentals of Content Amplification, let’s dig into the process of actually amplifying your content.
In Chapter 2, you will learn how to get your content in front of the people who are most valuable to your business, including how to set up the 7 most important audiences inside of Facebook’s Ads Manager.
One of the reasons Facebook is the perfect tool for Content Amplification is because it has 2.89 billion users, with hundreds of data points on just about every one of them!
The trick is finding the right users to consume your content. To do that, we’re going to use Custom Audiences.
What is a Custom Audience?
A Custom Audience is “an ad targeting option that lets you find your existing audiences among people who are on Facebook.”
How to Create a Custom Audience
No matter what kind of Custom Audience you’re creating, the first three steps will be the same.
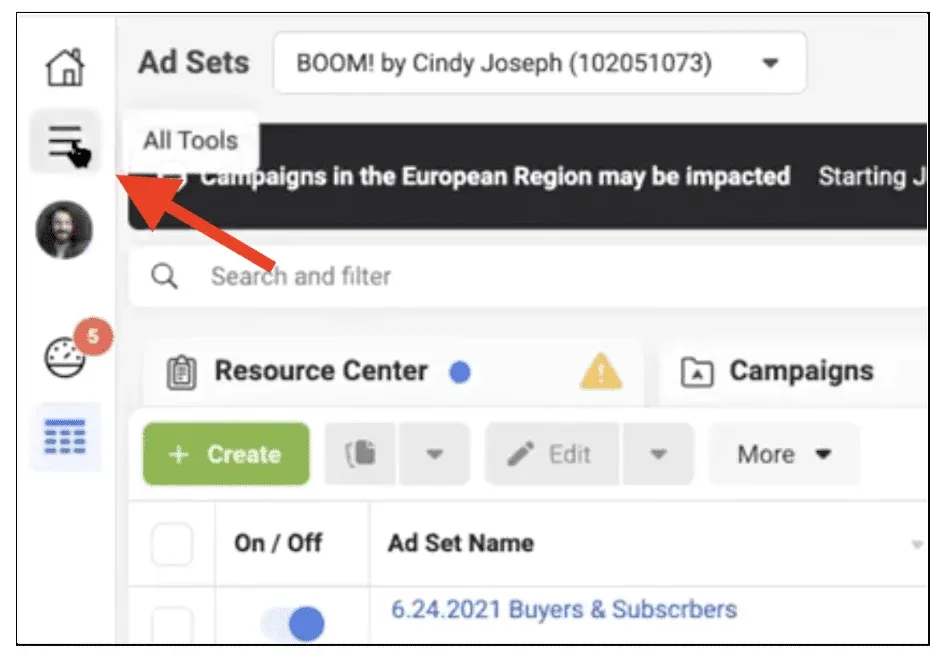
Step 1 – Within Facebook’s Ads Manager, click the “All Tools” hamburger menu in the top-left corner:
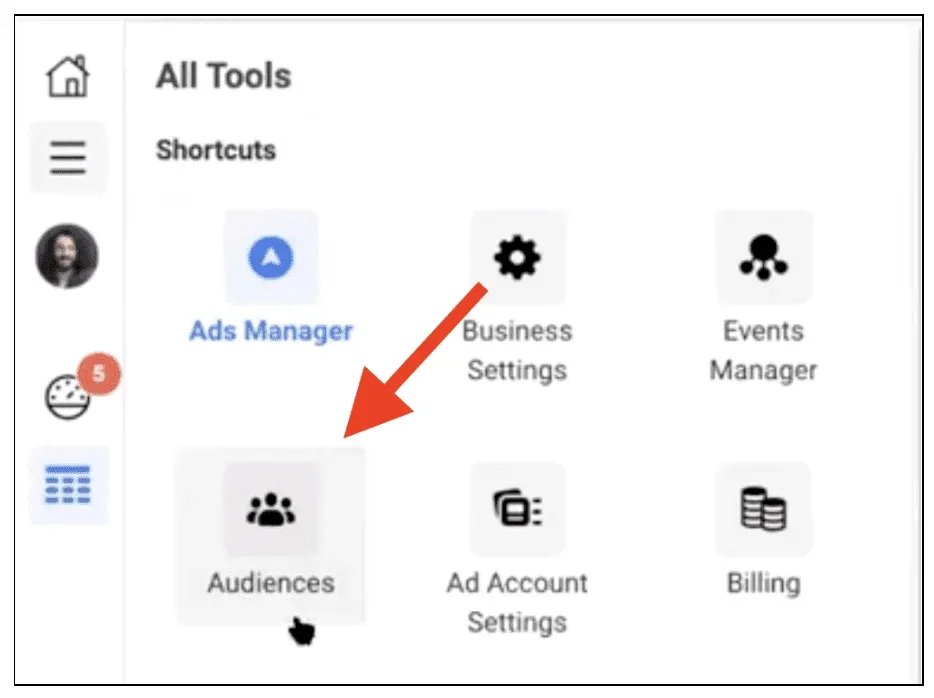
Step 2 – Click on Audiences:
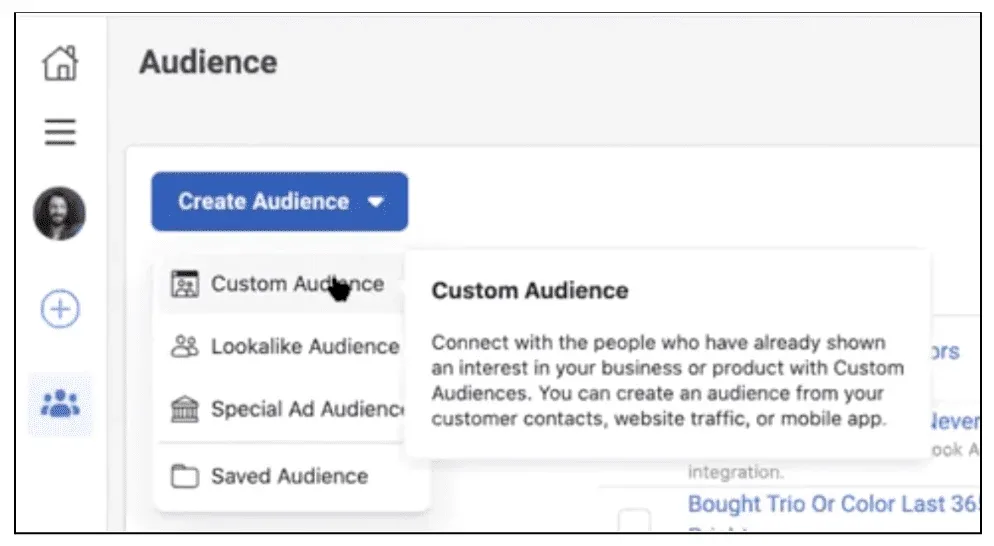
Step 3 – Click Create Audience and choose Custom Audience.
From here you will be prompted to choose an Audience Source, which will change depending on the type of Custom Audience you want to create.
The first source we’ll look at is Facebook.
(You can read more about the advanced options for Custom Audiences here.)
TIP Don’t “Boost” your posts.
You’ve probably seen Facebook’s “Boost” button on your posts, inviting you to pay to get your content in front of a wider audience. While this seems like a convenient option, it will actually ruin your content marketing strategy.
Build your audiences instead. This gives you more control over budgeting, segmentation and scale, and it will be helpful later when you want to monetize.
Read more about why you shouldn’t use the “Boost” button in my blog post.
How to Create Audiences of Facebook & Instagram Fans
As I said in Part 1, organic reach is way down on social platforms.
Your social fans and engagers are people who have already expressed interest in your brand, so it’s important that you use Custom Audiences to get your content in front of as many of them as possible.
Audience #1 | Facebook Page Engagers
Facebook Page Engagers are “people who have visited your Page or taken an action on a post or ad, such as reactions, shares, comments, link clicks or carousel swipes.”
Here’s how to build an audience of Facebook Page Engagers:
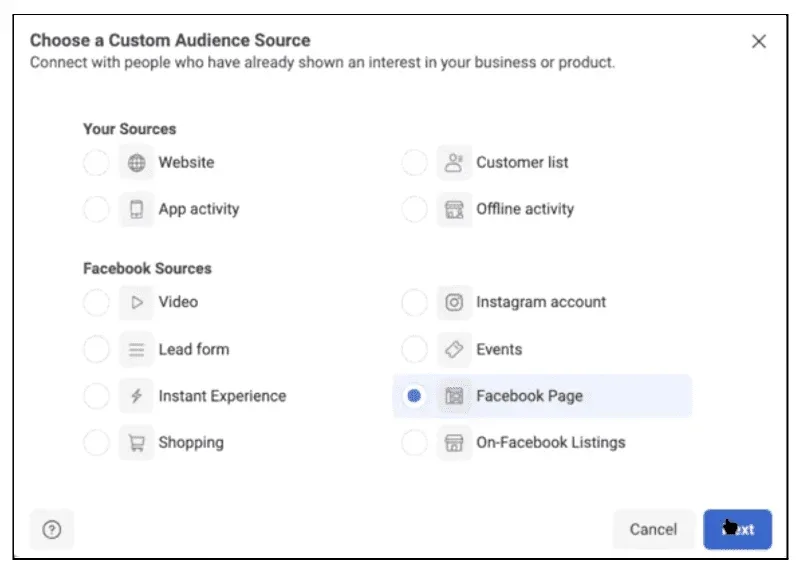
Step 1 – Choose a Custom Audience Source
In the “Choose a Custom Audience Source” pop-up, select Facebook Page and click Next.
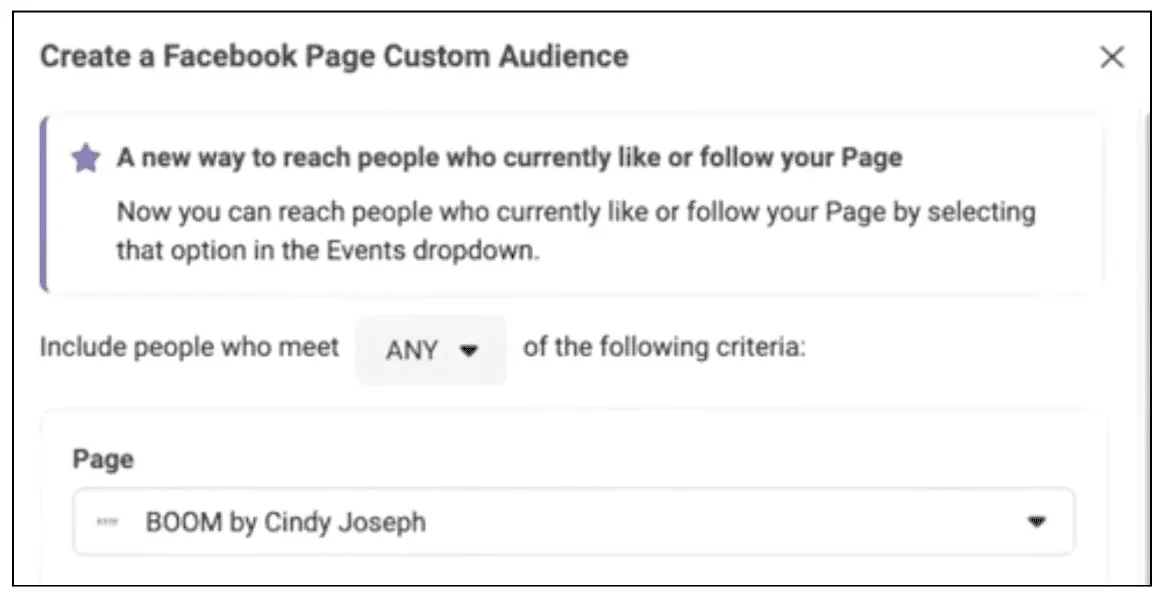
Step 2 – Select Facebook Fan Page
From here, select the fan page that you want to create the audience for (in this example, the page is BOOM by Cindy Joseph).
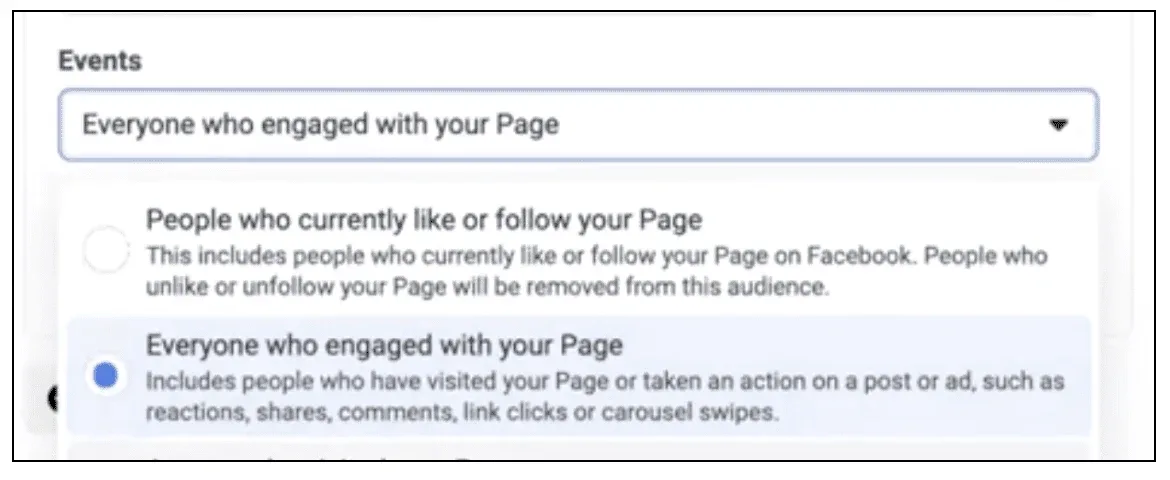
Step 3 – Choose Event(s)
“Events” are the actions that define the audience segment. For this audience, choose Everyone who engaged with your Page.
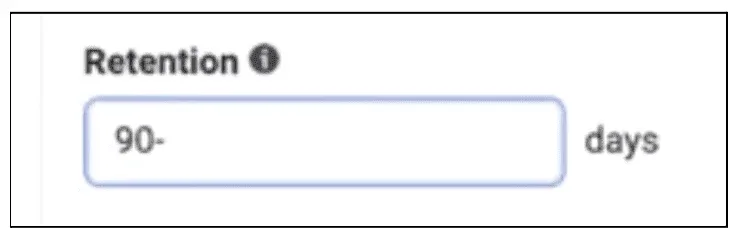
Set Retention Window
This is the time window in which Facebook will look at these events.
I like to do 90 days but you can go higher, especially if you have a smaller audience. This means that anyone who engaged with your Facebook Fan Page in the last 90 days will be included in this audience.
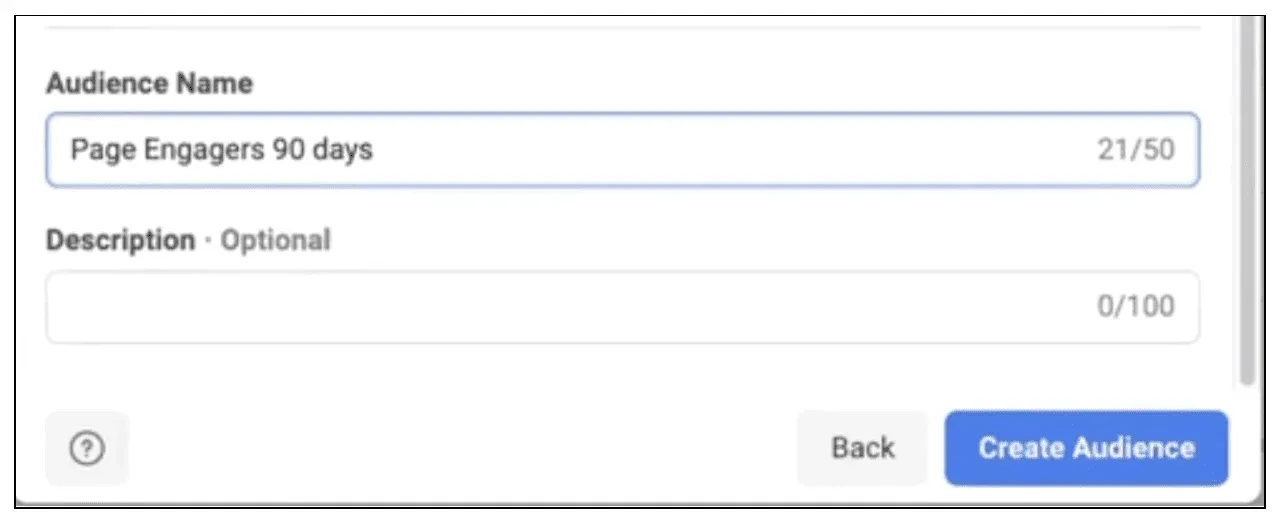
Name and Create Audience
Once you have your segments and engagement duration set, give your Audience a name that is easily recognizable. I like to follow the formula [Traffic Source] + [Segment Type] + [Retention Window].
For this audience, the name would be FB Page Engagers 90 Days (I accidentally left out “FB” in the image).
Once you’ve named it, click Create Audience.
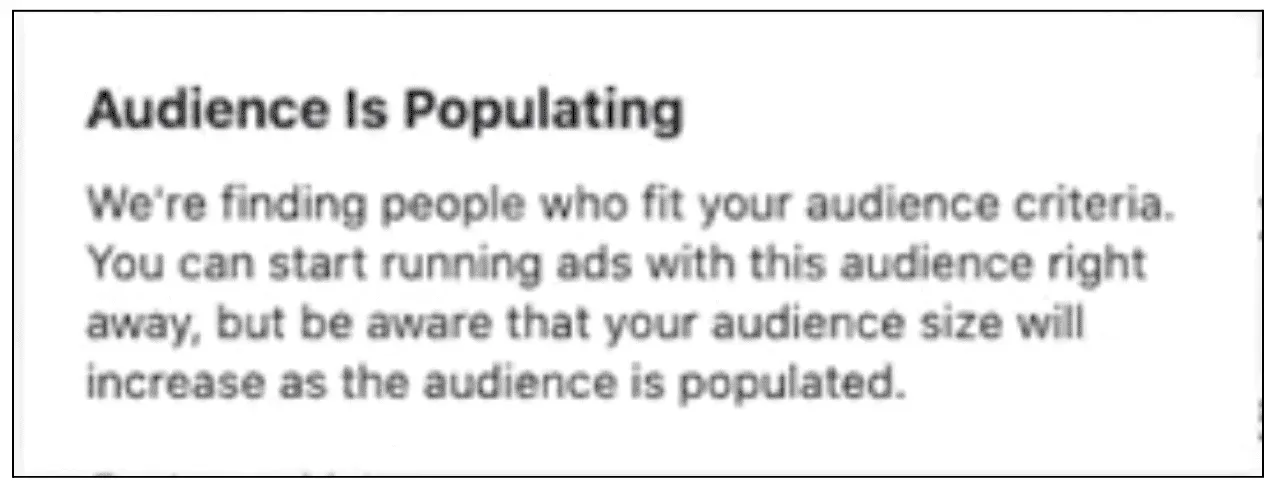
Let the audience populate.
Before you start running ads to this audience, wait for the audience to populate. You’ll know the audience is ready when the “Populating” text disappears — this usually takes a couple hours.
Audience #2 | Facebook Fans
Facebook Fans are “people who currently like or follow your Page on Facebook. People who unlike or unfollow your Page will be removed from this audience.”
To create this audience, use the same process as above, except:
For your Event, choose People who currently like or follow your Page.
Name the audience something like FB Fans. (There is no retention window, because they are either Fans of your page or they aren’t.)
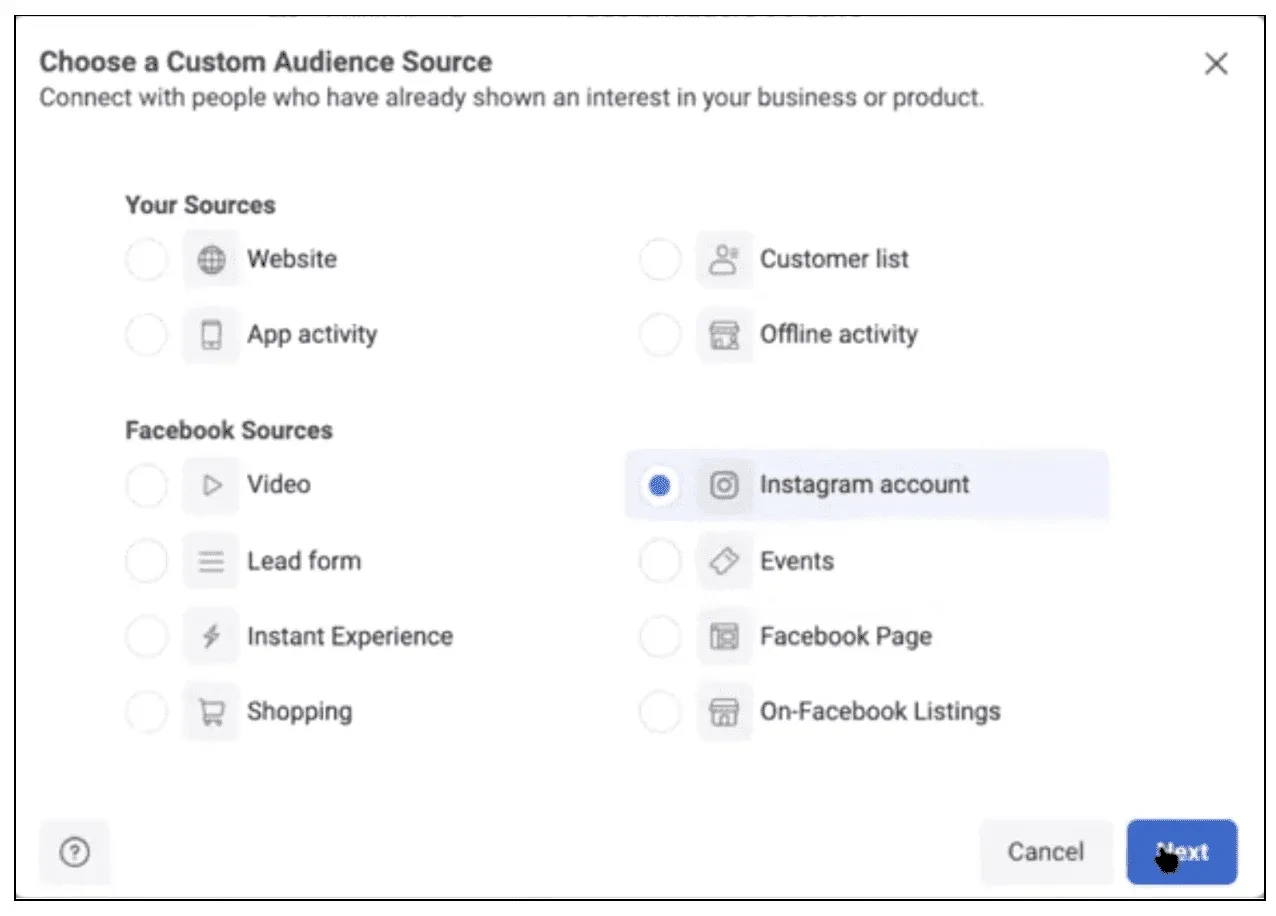
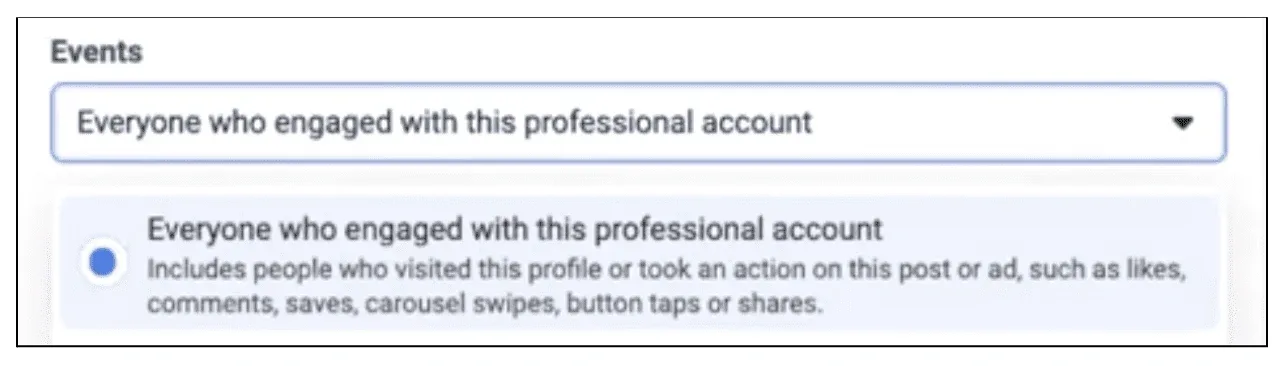
Audience #3 | Instagram Account Engagers
Instagram Account Engagers are “people who took an action on this post or ad, such as likes, comments, saves, carousel swipes, button taps or shares.” This will also include people who follow you.
To create this audience, follow the same process as the previous 2, except:
As your Audience Source, choose Instagram account.
As your Event, choose “Everyone who engaged with this professional account”.
Name your audience something like, “Insta Engagers 90 Days”.
Okay, so now we have audiences for Facebook Page Engagers, Facebook Fans and Instagram Page Engagers.
This is the pillar of people in our social orbit, and these 3 audiences will make up 1 ad set in our Page Post Engagement Campaign. (We will get more into campaign structure in Part 3.)
Our next step is to create audiences of our email subscribers and buyers.
Creating Audiences for Email Subscribers & Buyers
While email has higher organic reach than social, you still face issues with deliverability, the dreaded spam folder, and new complications due to iOS 15 — not to mention the likelihood that your content gets lost in the 160+ emails people receive each day!
That’s why we want to import our email subscribers into Facebook so we can communicate with them everywhere they hang out, not just on a single channel.
Audience #4 | Email Subscribers
How to Create an Email Audience Using Your CRM’s Facebook Advertising Integration (Recommended)
Most CRMs these days include an option to dynamically sync your email list over to Facebook. This is a real time saver.
To find instructions on how to do this with your CRM, I suggest Googling “[Your CRM name] Facebook Audience Integration”. One of the first hits should be a help article showing you how to do it.
After you sync your email list with Facebook, you will end up with an audience that looks like this:
How to Create an Email Audience Manually (Not Recommended)
If for some reason your CRM does not have an auto-sync option with Facebook, then you need to build your audience manually. Here’s how.
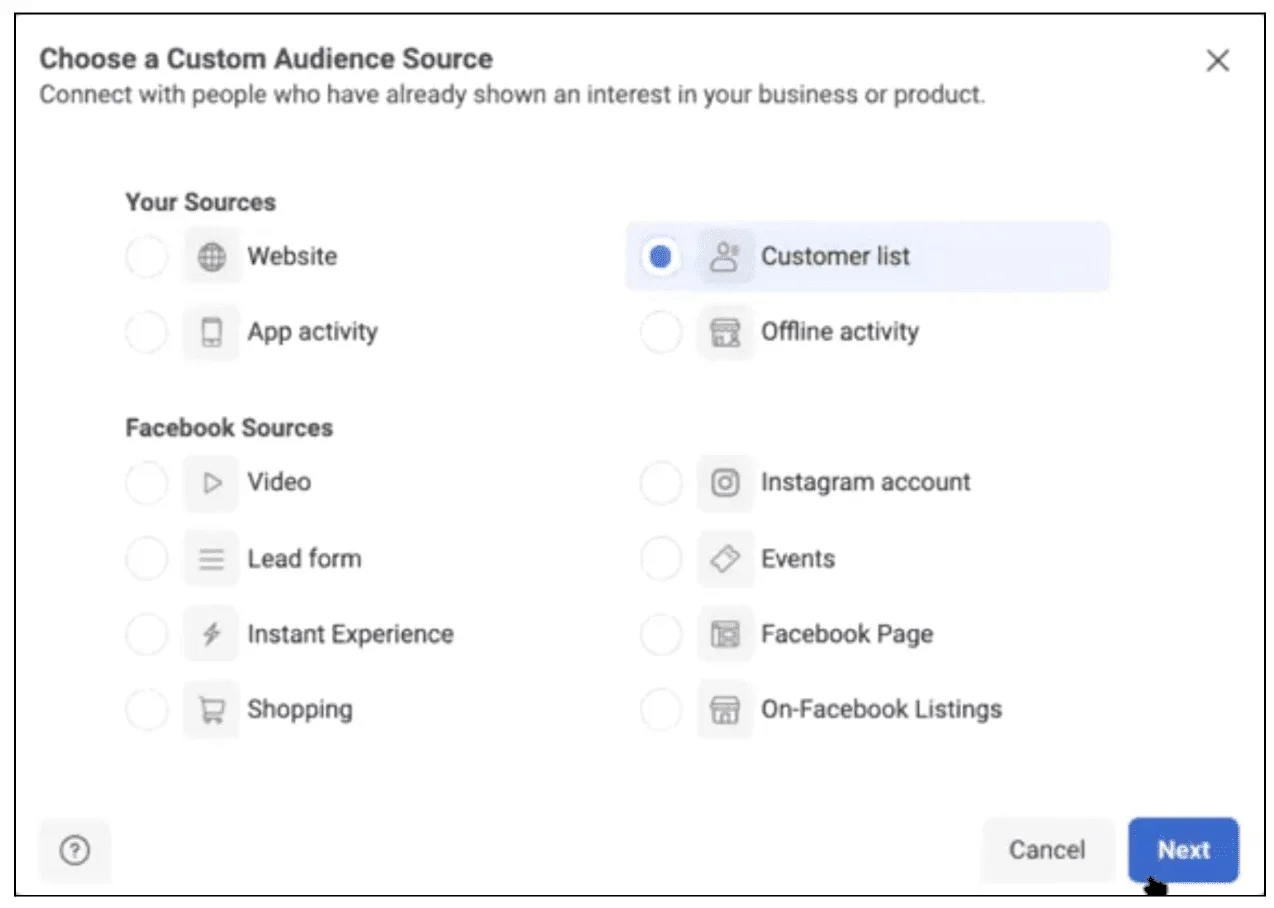
Create a Custom Audience.
As the Audience Source, select Customer list.
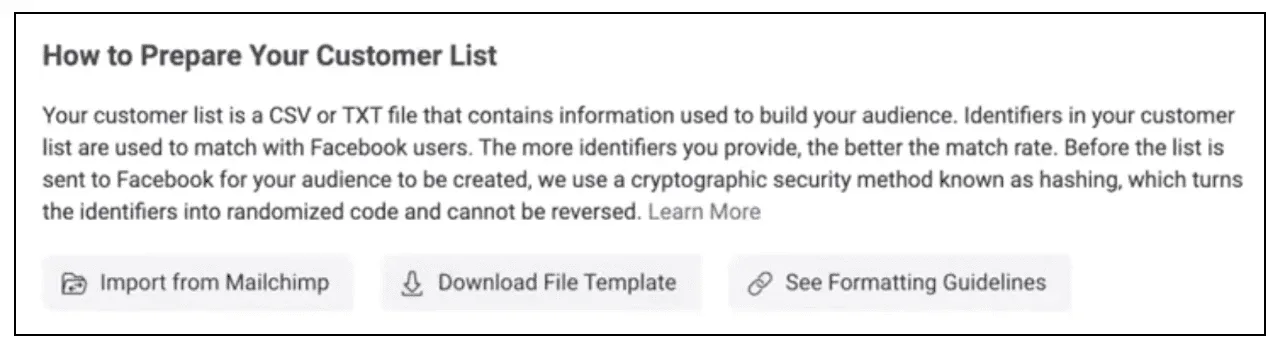
Prepare Your Customer List
Next, you need to import your email list into Facebook. They give you a few different ways of doing that:
If you have Mailchimp you can import your list directly from this screen. If not, click Download File Template and fill out the template with the data from your CRM.
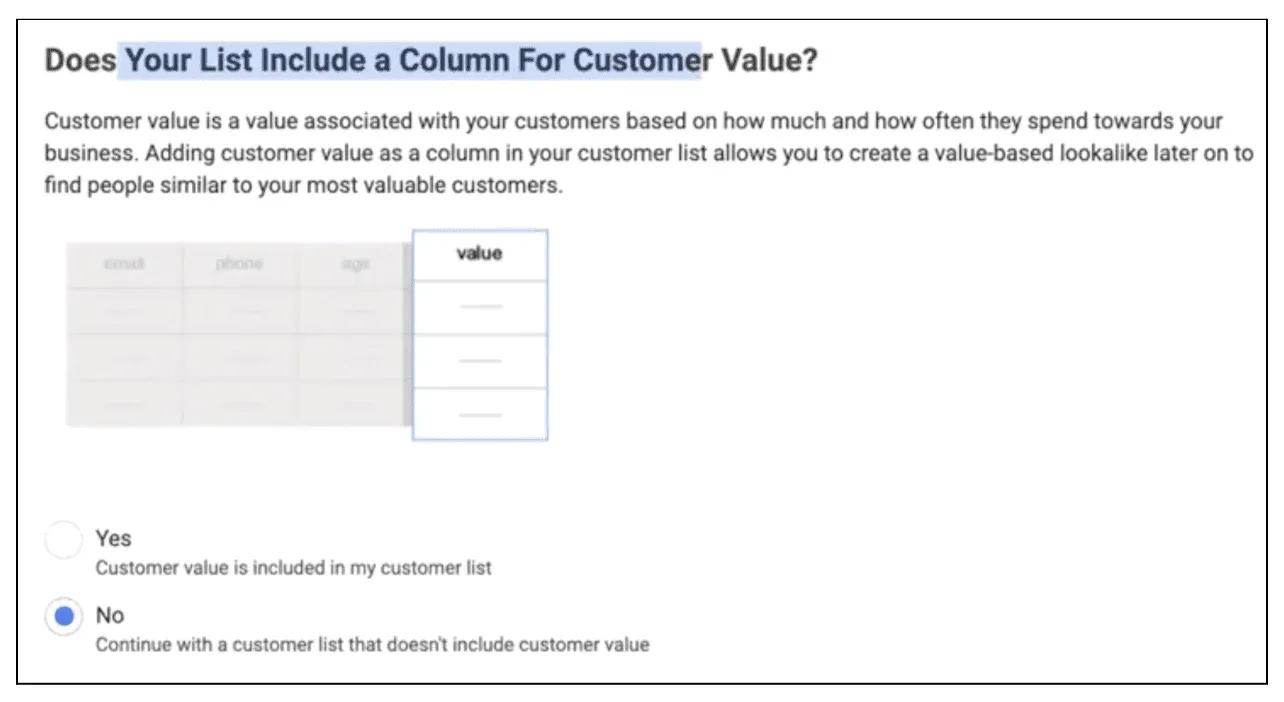
Select a list type.
On the next page, it will ask you if your list includes a column for “Value”, meaning a number assigned to each subscriber based on their value to your business. If you’re a marketing ninja, maybe your list has this. Otherwise just select “No”.
Add your customer list.
Update the template you filled out with your email subscriber data.
Name and Create your audience.
Name your new audience something like, “All Subscribers [DATE]”.
TIP Be sure to manually update these Audiences at least once a month.
If you are manually creating these email subscriber and buyer audiences, be aware that new people will not be added to these segments automatically as would be the case with a dynamic sync.
So make sure to manually update these audiences at least once a month, and to include the current date at the end of the Audience name (in this example, “9/1/21”) so you don’t forget the last time you did it.
Audience #5 | Buyers
Now, follow the same process you used to sync your email list to sync your customer list.
I include buyers in the last 2 years. If they haven’t bought from me in the last 2 years and haven’t ended up on one of my other Custom Audiences, then they’re probably no longer relevant to my brand.
Name your audience “Buyers [DATE]”.
So now you have audiences for your Facebook page engagers, Facebook fans, Instagram page engagers, email subscribers, and buyers.
Next, we’re going to pivot away from Custom Audiences to a different type of Facebook audience called Lookalikes.
TIP “Does email syncing comply with GDPR?”
The short answer is yes it does. As long as they subscribed to your list, you’re good to go.
Learn more about GDPR compliance in this episode of The Smart Marketer Podcast.
Creating Lookalike & Super Lookalike Audiences
So far in this article, we’ve focused on finding people who already know about and interact with our brands — i.e., warm audiences.
But Lookalikes and Super Lookalikes allow us to target cold audiences so we can grow the number of people who consume our content.
That’s the beauty of Content Amplification: it works in both top-of-funnel and middle-of-funnel campaigns, ensuring that your content is being leveraged throughout the customer journey.
Audience #6 | Lookalike
Lookalike Audiences are “a way your ads can reach new people who are likely to be interested in your business because they share similar characteristics to your existing customers.”
Facebook is essentially using what they know about people who like your brand to find other people who are similar to them (because hopefully they like your brand, too!).
Here’s how to create this audience.
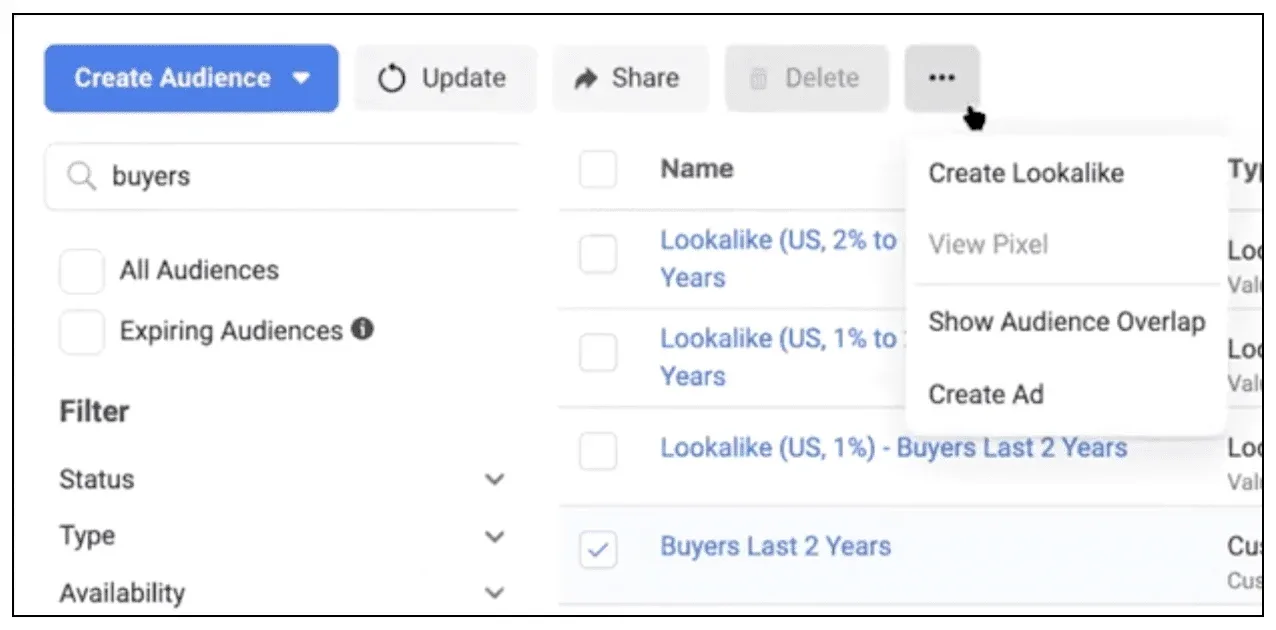
Choose an audience to create a Lookalike from.
And make sure the audience is finished populating before trying to create a Lookalike.
Click Create Lookalike.
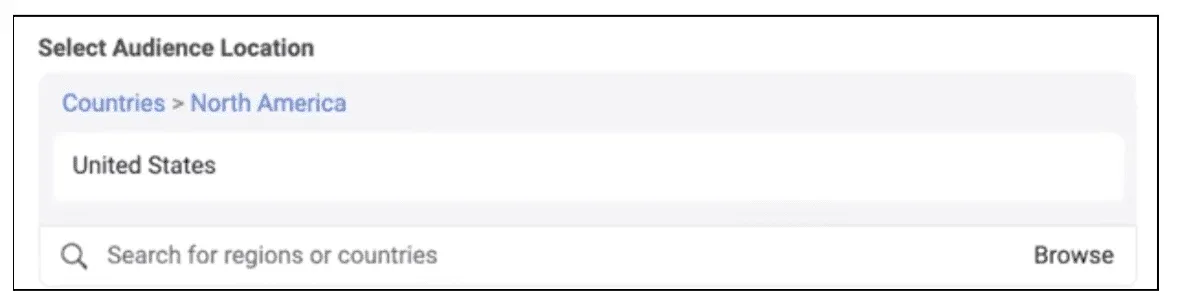
Select Country
Choose the country that you want to create the Lookalike in.
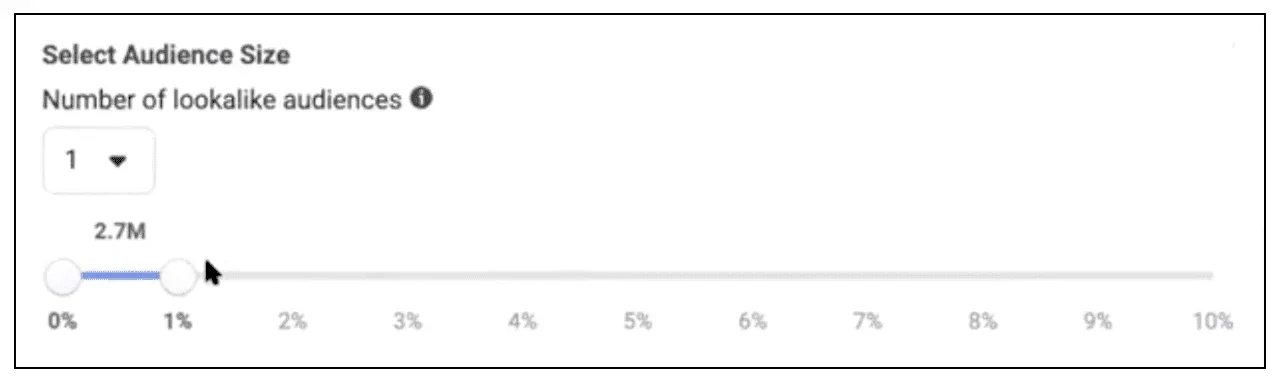
Select Audience Size
We’re going to create what’s called a 1% lookalike. You can do up to 10%, but 1% will be the people that look the most similar to your buyers.
Now, Facebook is going to look at all the people who bought from you in the last two years and it’s going to find the 1% of people who share the most data points with them.
Click Create Audience.
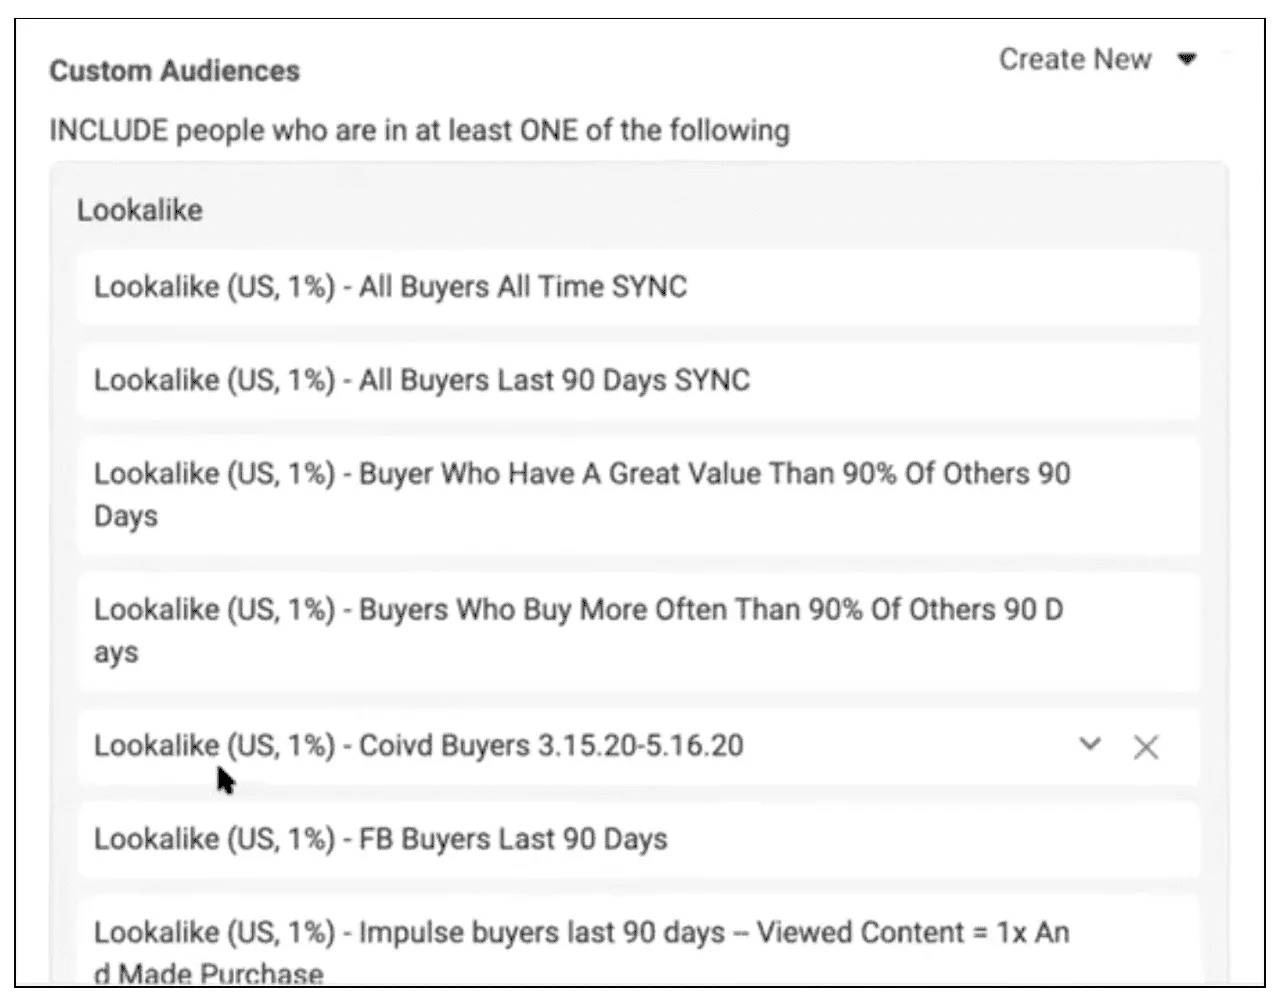
Audience #7 | Super Lookalikes (Advanced)
A Super Lookalike audience is a collection of different Lookalikes that you target in a single ad set.
So instead of increasing the percentage of your Lookalike (say from 1% to 5%) and thereby lowering the quality of the audience, you can simply make several Lookalikes of all of your best segments.
That way, you get more people to market to while still ensuring they’re the best prospects Facebook has to offer.
Here’s how to create this audience.
Create several Lookalikes
Use the process above to make Lookalike audiences for your best customer segments.
In my case, I did a Lookalike of buyers in the last 90 days, of buyers who have a high average order value, of buyers from Facebook, etc.
Combine in a single ad set
Make sure all of your Lookalikes are in the same ad set. You can name this ad set “Super LL 1%”. (We will get more into campaign structure in Part 3.)
TIP Exclude Buyers & Subscribers from your Lookalike Audiences
When amplifying content, you want separate ad sets for your Lookalikes and your Buyers/Subscribers. I’ll get more into ad sets in the next part of this series, but for now just make a mental note.
To review, in this article we created Facebook audiences for:
Facebook Page Engagers
Facebook Fans
Instagram Page Engagers
Email Subscribers
Customers
Lookalikes
Super Lookalikes
Good job!
Now that you have your audiences set up, you’re ready to create the actual campaigns that you will use to amplify your content.
CHAPTER 3
How to Advertise a Blog Post on Facebook & Instagram In 8 Simple Steps (with Fill-in-the-Blank Examples)
In this chapter, I will teach you the entire process step by step for how to advertise a blog post on Facebook and Instagram.
By the end of these 8 steps, your first ad campaign will be live and you will be actively growing your blog with content amplification.
And it doesn’t matter if you never ran Facebook ads before — all you have to do to be successful is follow my instructions and fill in the blanks for your own brand.
Getting Started With Facebook & Instagram Advertising
If you already have a Facebook Page and Instagram Business account for your brand, then you can skip ahead to the next section: How to Structure an Ad Campaign in Facebook Ads Manager.
In this section, you will learn how to create a Facebook Business Page and Instagram Business Account, so that you can begin running ads from these accounts later in the chapter.
How to set up a Business Page & Instagram Account for your brand:
Create a personal Facebook Profile
Every Facebook Profile includes access to Facebook’s Ads Manager by default, so if you already have a Facebook profile then move onto the next step. If you need to create a Facebook profile then click here.
Create a Facebook Business Page
Next, you will need to set up a Facebook Page for your business.
Facebook Pages are like Profiles but for commercial use, and you need to create one before you can advertise your brand’s content. Go to facebook.com/pages/create to create a Page for your brand.
Create an Instagram Business Account
Lastly, you will need to create an Instagram Business Account so you can run ads on Instagram also.
Go to instagram.com to create a new account for your brand, and then register it using your personal Facebook Profile.
Now you can create both Facebook and Instagram ads from your Facebook Ads Manager, and you’re ready to plan your campaign.
How to Structure an Ad Campaign in Facebook Ads Manager
In the next section, you will log into Ads Manager and start creating your first campaign.
But before you do that, you should understand how Facebook campaigns are structured so you know what you’re building.
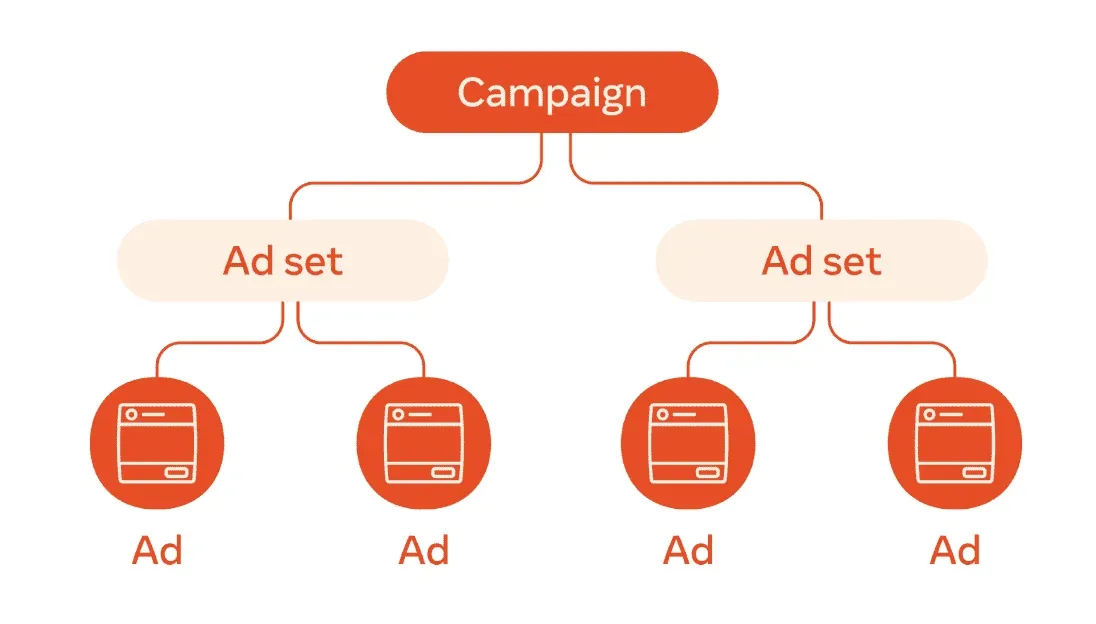
Every Facebook and Instagram campaign is organized into 3 levels:
Campaign Level This is the highest level of your campaign structure where you select your campaign objective, which is the action you want people to take once they see your ad.
Ad Set Level This is the middle level of your campaign where you select the Audience for your ads and choose where on the Facebook and Instagram platforms your ads will be displayed.
Ad Level This is the final level of your campaign where you choose the creative elements of your advertisement like the text, images, GIFs, videos, and CTAs.
Here’s a visual example of a campaign structure that Facebook uses on their website:
You can create as many ads and ad sets inside your campaign as you like, but every campaign must contain at least 1 ad set and 1 ad.
The more audiences you want to target in your ad sets or creative elements you want to test in your ads, the more complex your campaign will be.
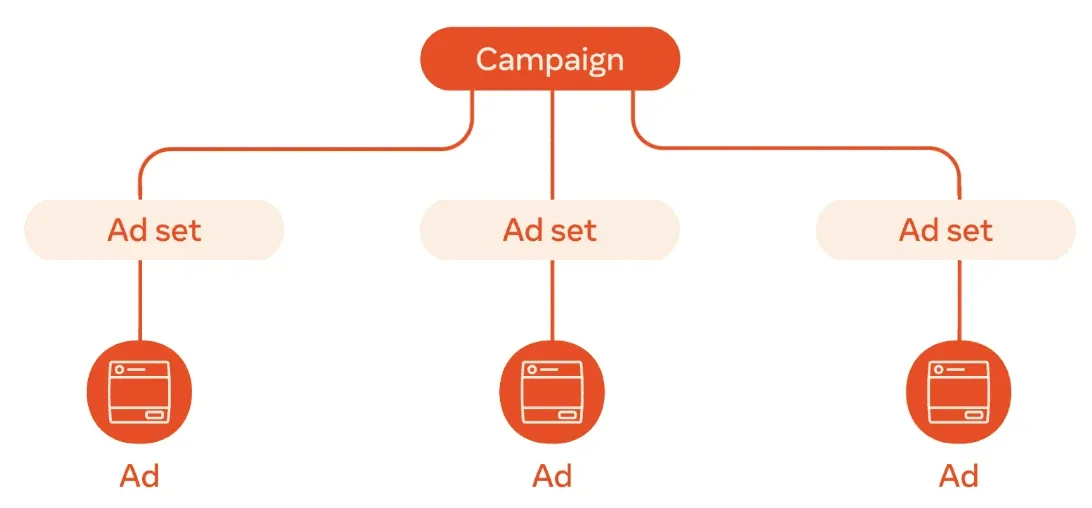
In this chapter, you will create 1 Campaign with 3 Ad Sets and 3 Ads (1 ad inside each ad set).
So the structure of the campaign we are about to build looks like this:
If this seems like a lot of work and you’re starting to feel overwhelmed, don’t worry. It’s easier than it looks.
Your three ads will be identical, so all you will need to do is duplicate them and change the target audience. The next section walks you through the entire process, step by step.
Okay, are you ready to build your first content amplification campaign?
Log into your Facebook Ads Manager, and let’s jump in.
How to Advertise a Blog Post on Facebook and Instagram in 8 Simple Steps
A quick note before you begin Step 1…
In order to complete these steps, you need to create custom audiences in Facebook for the following groups of people:
Facebook Page Engagers
Facebook Fans
Instagram Page Engagers
Email Subscribers
Customers
1% Lookalike of Buyers
If you don’t know how to make custom audiences yet, then go read Chapter 2 of this article to learn how to create the 7 most important custom audiences you need for content amplification.
Okay, now you can get started!
Step 1. Create an Engagement Campaign in Facebook Ads Manager
From your Facebook Ads Manager, click the Create button in the top menu.
Then under Choose a campaign objective, select Engagement.
Click Continue to create your Engagement Campaign.
TIP Create Engagement Campaigns
There are multiple campaign objectives to choose from, but for content amplification you only need to focus on Engagement.
The goal of engagement campaigns isn’t to drive immediate conversions — it’s to get as many likes, comments, and shares of your content as possible so you build stronger relationships with your audience. The conversions come later.
Step 2. Customize Your New Engagement Campaign
You are now working from the Campaign Level where you can customize your campaign.
This navigation bar will remain at the top of your Ads Manager while you’re editing your campaign, so you can easily switch between every level of your campaign structure:
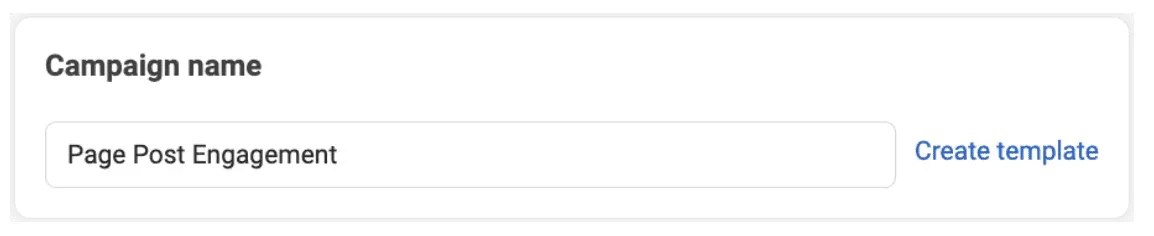
Name Your Campaign
First, name your campaign “Page Post Engagement”.
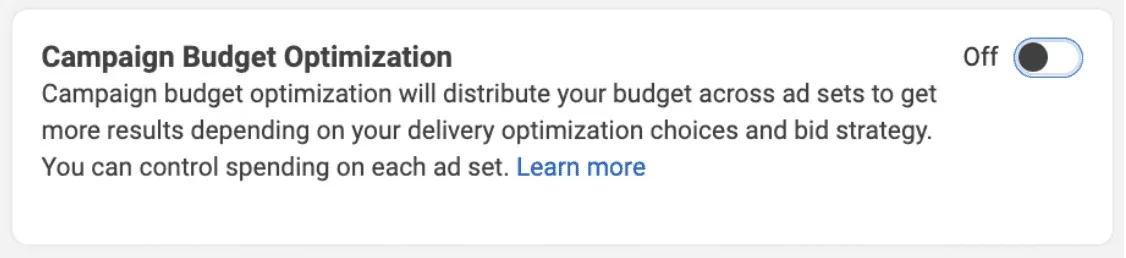
Turn Off CBO
Next, scroll to the bottom of the page and turn off Campaign Budget Optimization (CBO).
You want to turn off CBO so that Facebook distributes your budget equally between all three ad sets. If CBO is turned on, Facebook will spend your budget on the ad sets that get the highest engagement and leave out the others.
Since you want to amplify content to every custom audience, you will set your budget manually at the Ad Set Level in the following step.
Now click Next to create your first ad set.
Step 3. Customize Your First Ad Set to Target Buyers and Subscribers
You are now working at the Ad Set Level of your campaign where you can customize your ad set.
This is where you will do most of the setup required to launch your campaign, but fortunately you only have to do it once.
After you finish Step 3, you’ll learn how to copy and paste these settings so you can quickly apply them for all your future content amplification campaigns.
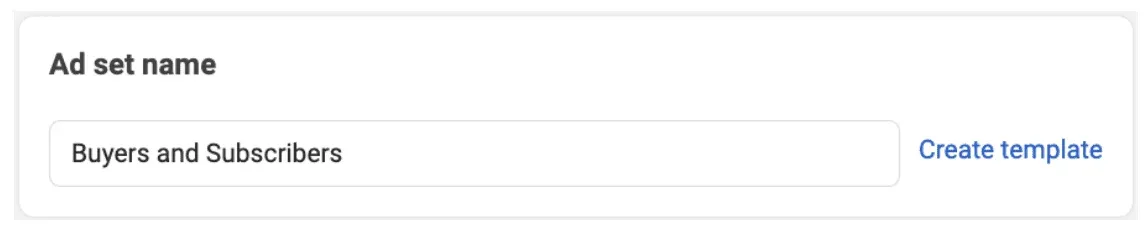
Name Your Ad Set
First, name this ad set “Buyers and Subscribers”.
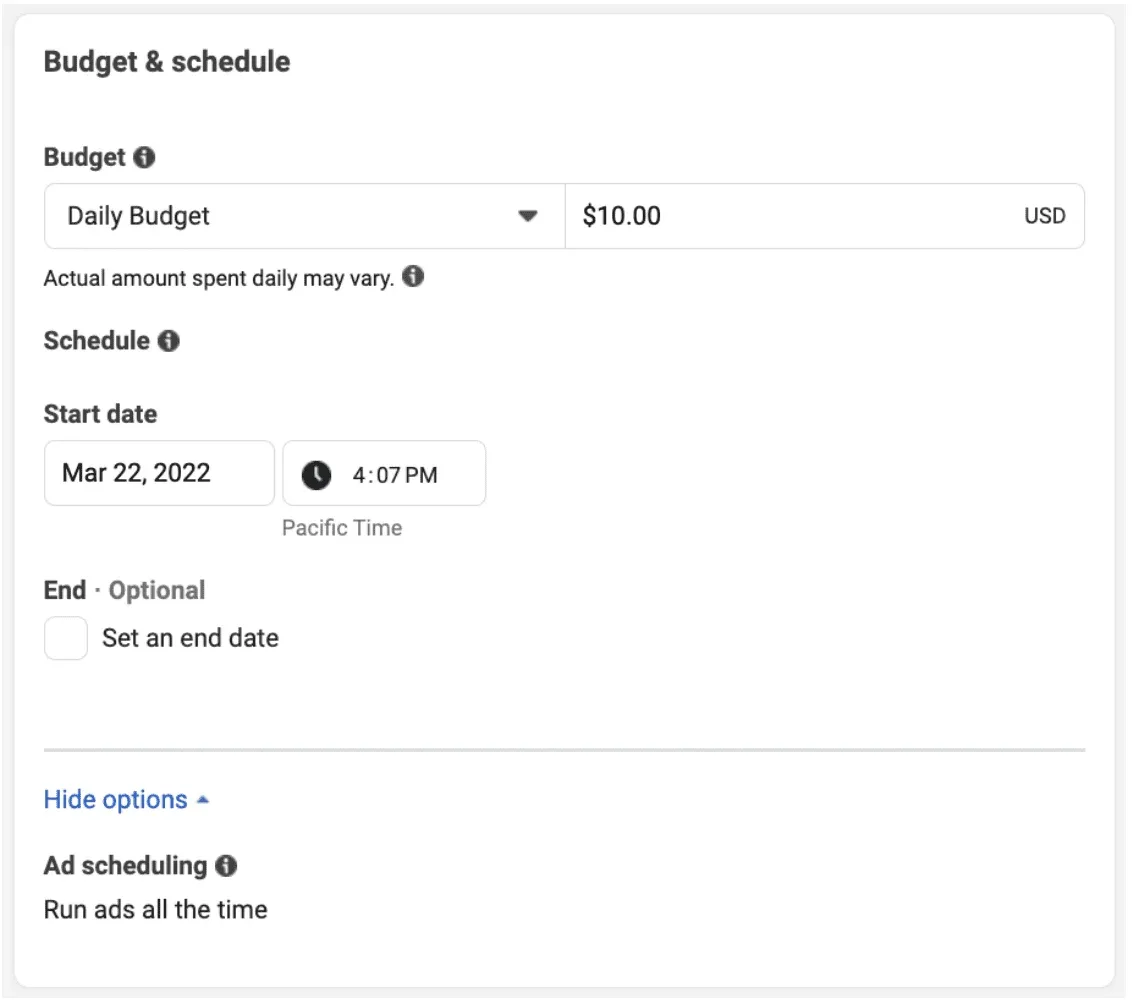
Next, you will need to input your daily budget for this first of three ad sets.
Set Your Budget
Important: You are building a campaign with three ad sets in total. So decide what your daily budget will be for this entire campaign, then divide it by 3 to get your budget for this particular ad set.
TIP Start with $10 per day.
You don’t need a big budget to be successful. You can start by spending $10 a day (or $3.33 each for three ad sets), and increase your budget as your brand grows.
Remember from Chapter 1 that content amplification campaigns are scalable which means they work with any budget, whether you’re reaching 1,000 readers a week or 100,000.
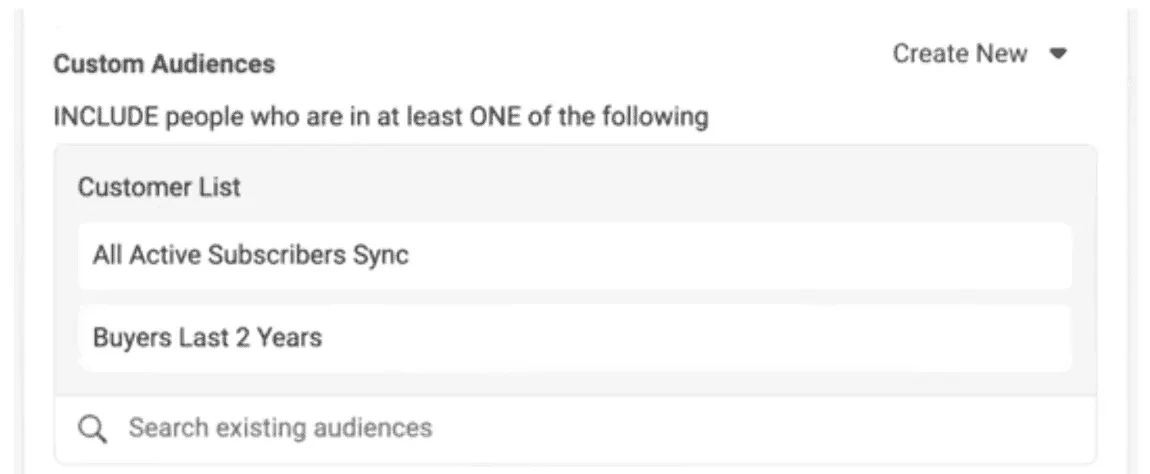
Define Your Target Audience
Next, scroll down to the Audience section where you will select your first target audience.
Under Create New Audience, you can search for every Custom Audience you’ve created in the past. This is where you will choose from the custom audiences you created in Chapter 2.
For your first ad set, you want to target your list of Customers and your list of Email Subscribers.
First, search for the custom audience you created titled “Buyers [DATE]” and then select it to add to this audience.
Then, search for your custom audience titled “All Subscribers [DATE]” and add it as well.
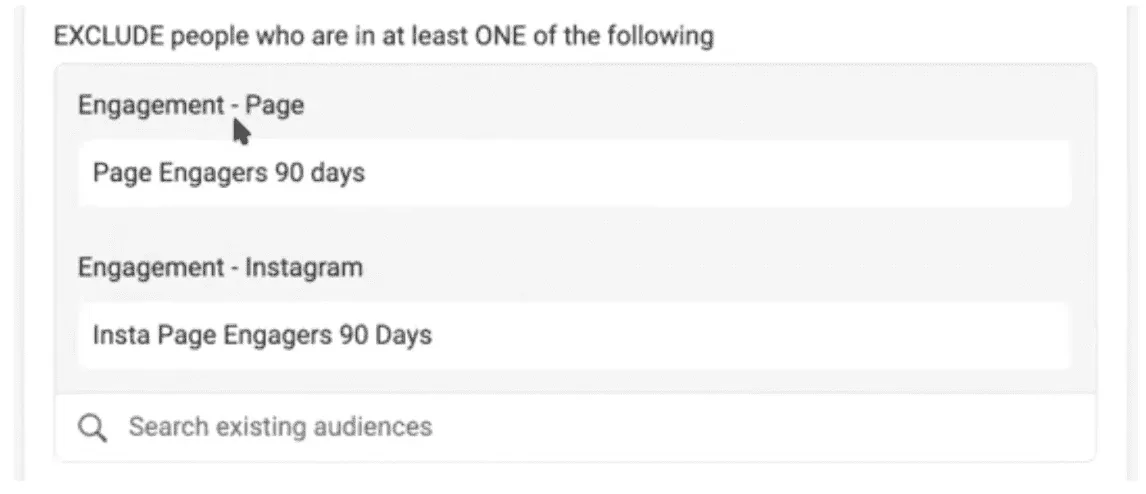
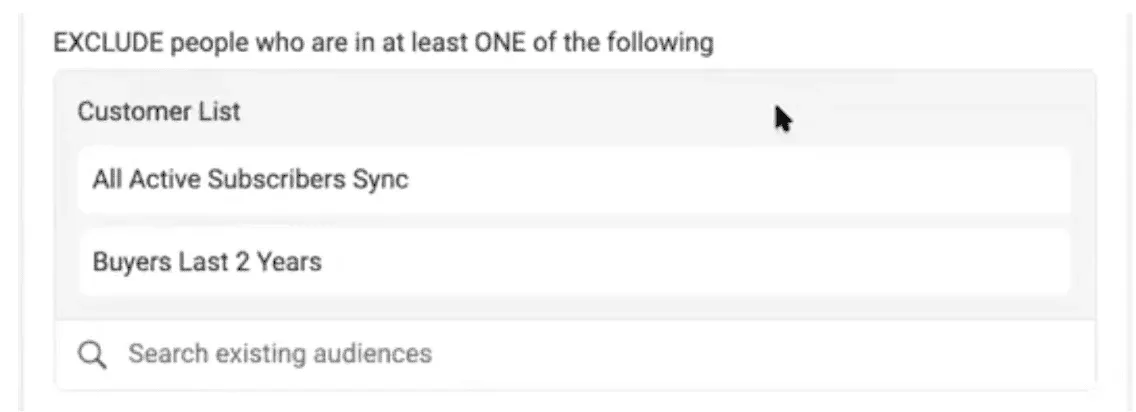
Exclude Audiences You Will Target Separately
You also want to exclude your custom audiences of Facebook fans, Page engagers and Instagram page engagers because you will target them separately in the next ad set.
So click the Exclude button and select “FB Fans”, “FB Page Engagers 90 Days”, and “Insta Engagers 90 Days”.
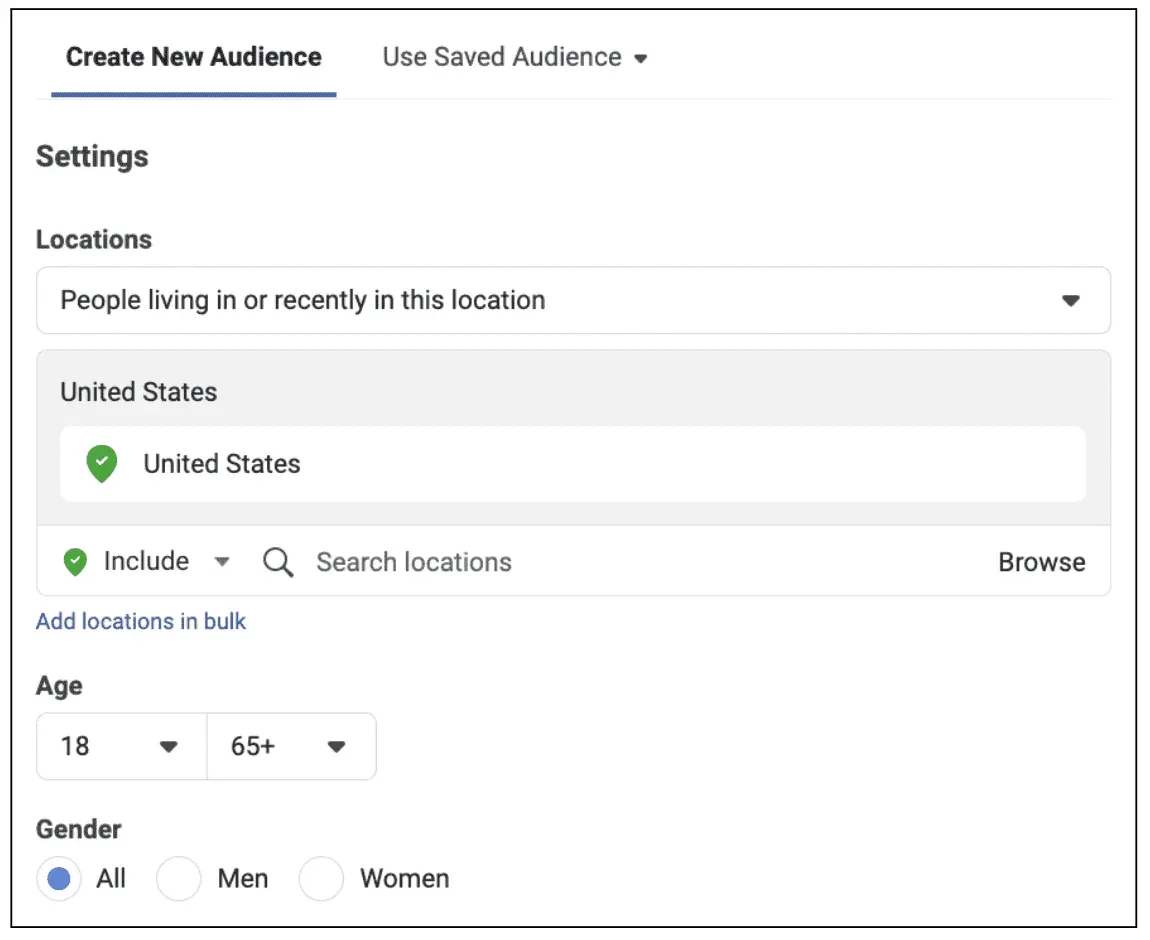
Filter by Location, Age, and Gender (Optional)
You can also click on Settings in the Audience section to filter your audience by location, age, and gender.
However — typically you do not want to exclude buyers based on location, age, or gender unless you know your customer demographics very well.
Though, for my 8-figure ecommerce store BOOM! By Cindy Joseph, I do customize all three filters for our ads, and here’s why:
I know that 10% of our sales come from Canada, so I edit the Locations to include Canada along with the United States. If you don’t sell to other countries, then don’t include them.
I know that anyone under 50 is also very unlikely to buy from my brand, so I set my Age Range to 45+. If you sell to every age range, then don’t exclude anyone based on age.
I know that men don’t purchase my products for the most part, so I filter my audience to reach only women. If you sell to both genders, then include All genders.
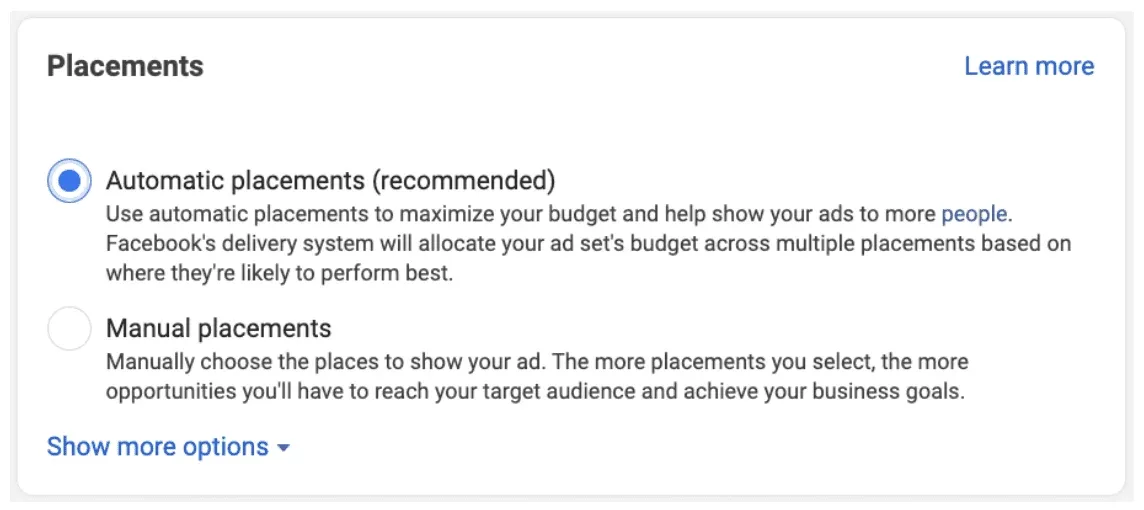
Choose Your Ad Placements
Next, you need to select between Automatic or Manual placements.
The Placements section is where you decide the locations that your ads will be shown on the Facebook and Instagram platforms.
I recommend you choose Automatic placements which will deliver your ads everywhere on both of the Facebook and Instagram platforms based on where they are likely to perform best.
However, if you choose Manual placements you can select exactly where your ads will be delivered by setting up filters for locations, like:
Platforms
Feeds
Stories & Reels
Messages
Marketplace
Apps & more
For example, you could opt to deliver your ads only on Instagram and not Facebook feeds; or only on Instagram Reels and not Stories; or only on Facebook Marketplace for desktop devices, etc…
If you want to view every available ad placements for your brand select Manual placements, or read this Facebook article.
Now click Next to complete your first Ad Set and create your first Ad.
Step 4. Create Your Ad From An Existing Blog Post
You are now working at the Ad Level of your campaign where you can customize the creative elements of your ad.
Name Your Ad
First, Name your ad using this simple naming convention of “[DATE].POST-TITLE” to keep your Ads Manager organized.
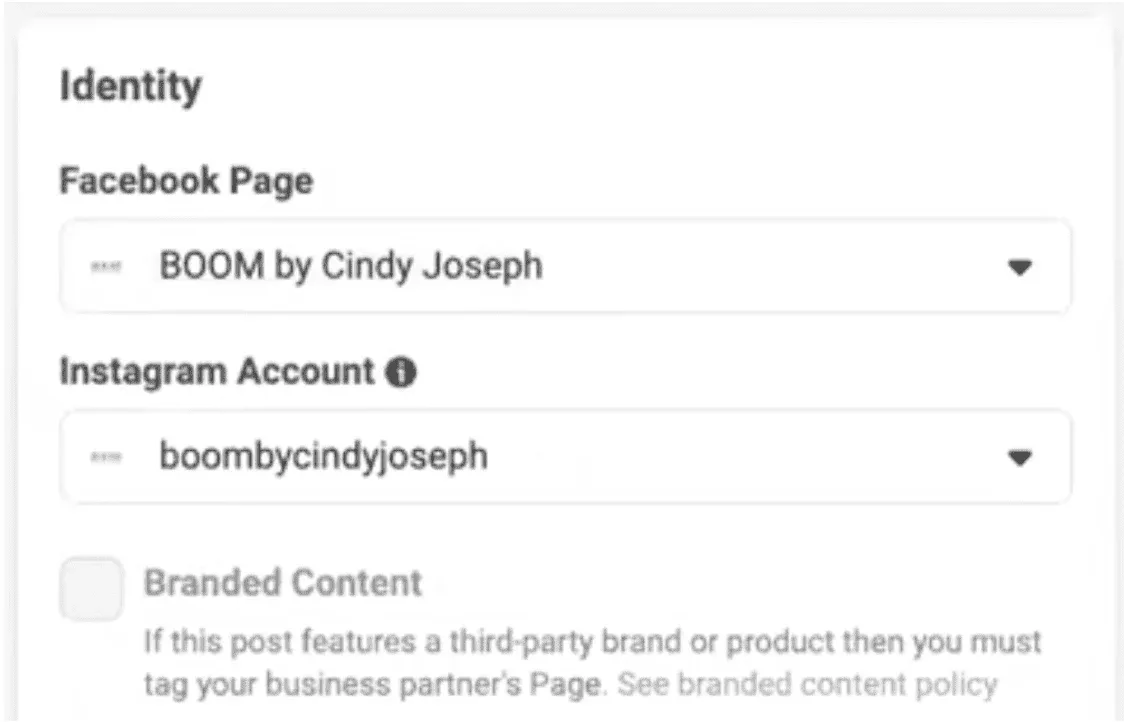
Connect Your Business Accounts
Next, select the Facebook Page and Instagram Account of the business you are advertising.
This gives you access to all the blog posts previously published by these two accounts.
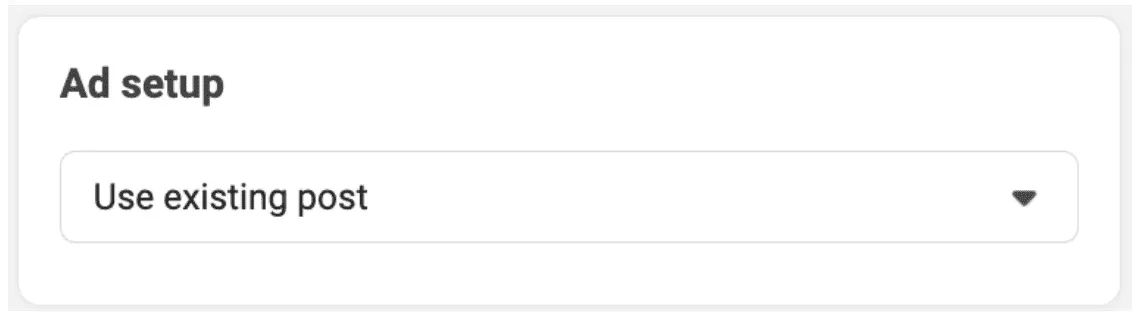
Select Your Blog Post
Now, you will select which of your published blog posts you want to advertise first.
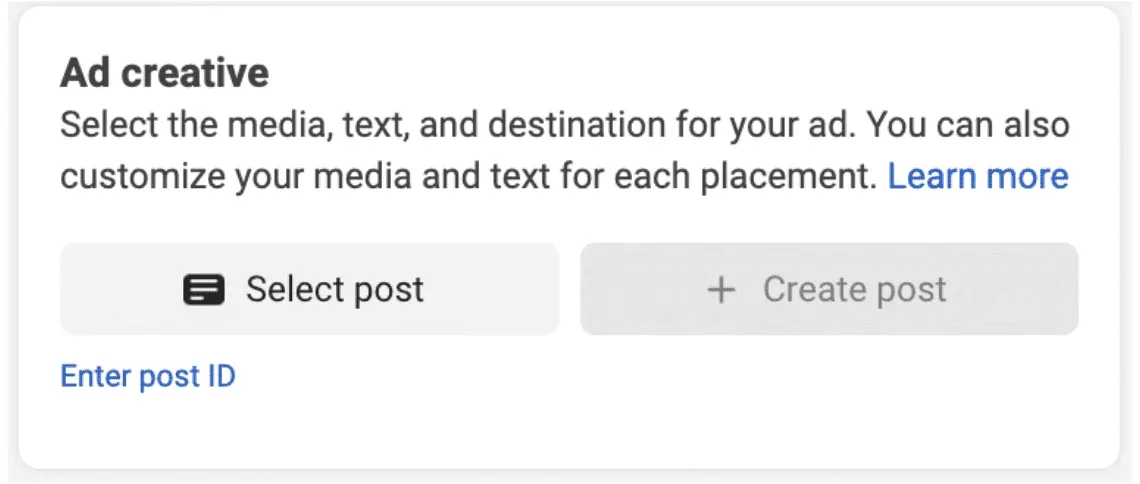
To do this, scroll to the Ad setup section and choose to Use existing post.
Then under Ad creative click Select Post.
Now, you can select from a list of every post ever published to your Facebook Page and Instagram Account.
Select the blog post you want to advertise and click Continue.
TIP Advertise an Existing Post.
When you advertise a post you’ve already published organically, you accumulate all the social proof under one ad instead of splitting it between multiple. And the more social proof your ad has (likes, views, comments, shares), the cheaper it is to advertise.
So if you haven’t published your post to your Facebook Page yet, then go do that before moving to the next step.
Customize Your Ad (Optional)
After you select the post, you have the option to Add a Call to Action to Your Post, like a button that links to your store.
I do not recommend adding a call to action to your ad, because the goal of content amplification isn’t to make immediate sales, it’s to get more engagement. Plus — ads that have buttons tend to cost more because they send Facebook users off the platform
Now click Publish to complete your first ad.
As soon as Facebook finishes reviewing your campaign, your ad will go live for all your buyers and subscribers to see!
Here’s how a recent content amplification ad looks from Smart Marketer once it’s published:
GREAT JOB! You just launched your first content amplification ad. And believe it or not, you’re almost done with this chapter!
Let’s review the steps you completed so far:
You created one engagement campaign in Ads Manager.
You created one ad set targeting a custom audience of buyers and Subscribers.
You created one ad from an existing post you published to your Facebook Page.
Now, you only need to target your “Fans & Engagers” and your “1% Lookalike” to complete Chapter 3…
There are only a few steps left, so let’s keep going!
Step 5. Duplicate Your First Ad Set
To speed things up, in this section you will learn how to Duplicate an entire ad set so you can quickly target new audiences.
Duplicating your ad set copies all of your custom campaign settings, so you don’t waste time repeating steps you already did in a previous ad set.
How to duplicate an Ad Set in Facebook Ads Manager:
Go to the Campaign tab inside of Ads Manager, and select the campaign that contains the ad set you want to duplicate. This will display every ad set within that campaign.
(Right now, you only have one ad set created named “Buyers and Subscribers”.)
Select the ad set, and click the Duplicate button in the top menu.
Choose Original Campaign as the location where you want to duplicate your ad set, then click Duplicate.
Your ad set is now duplicated in your original campaign, and you’re ready to customize it for the next target audience.
Step 6. Customize Your Second Ad Set to Target Fans and Page Engagers
Next, you’re going to edit the ad set you just duplicated to target your custom audiences of Facebook fans, Facebook Page engagers, and Instagram Page engagers.
Name Your Ad Set
Start by changing the Name of this second ad set from “Buyers and Subscribers” to “Fans and Page Engagers”.
Define Your Audience
Scroll down to the Audience section and remove the two custom lists of “Buyers” and “Subscribers” from your Custom Audiences.
Then search for the custom audiences you created for “Facebook fans”, “Page engagers”, and “Instagram Page engagers” and include those instead.
Exclude Buyers and Subscribers
You also need to remove “Fans” and “Engagers” from your excluded audiences, and Exclude your custom audiences of “Buyers” and “Subscribers” instead.
Keep Your Other Settings the Same
Then, every other variable in this ad set stays the exact same:
Budget
Location
Age Range
Gender
Placements
Updating your Custom Audiences (i.e., who you’re targeting) is the only thing you need to do to complete your second ad set.
You don’t even need to re-select the Existing Post for your ad again, because when you duplicate any ad set then all the ads inside that ad set get duplicated, too.
Click Publish to launch your second ad set and ad.
TIP No Fans or Engagers yet?
If you have a brand new Facebook Page or Instagram account with little to no fans or Page engagers, then you can just include these custom audiences in your first ad set with your buyers and email subscribers.
After a few weeks of running content amplification ads, you can include this custom audience once you receive more engagement.
Step 7. Duplicate Your Second Ad Set
Next, you are going to Duplicate your second ad set in order to target your custom audience of 1% Lookalikes.
To do that, you can repeat the following instructions from the previous step: How to duplicate an Ad Set in Facebook Ads Manager.
Once your third and final ad set is created, you can move on to Step 8.
Step 8. Customize Your Third Ad Set to Target 1% Lookalikes
You’ve reached the final step!
Now you just need to customize your third ad set so you can target the custom audience you made for 1% Lookalikes:
Name Your Ad Set
Start by changing the Ad Set Name to “1% Lookalike”.
Define Your Audience
Next, in the Custom Audience section, remove “Facebook fans”, “Page Engagers”, and “Instagram Page Engagers” from your included audiences.
Then Include your custom audience of “1% Lookalike” instead.
Exclude Your Audiences From Other Ad Sets
Then, Exclude your custom audiences of “Buyers,” “Subscribers,” “Fans,” “Instagram Page Engagers,” and “Page Engagers” because you are already targeting them separately in your other ad sets.
Keep Your Other Settings the Same
You can keep every other custom setting in your ad set the same, including your ad and everything at the Ad Level.
Now click Publish to launch your third and final ad set and ad.
CONGRATS! You just completed Chapter 3.
You are now advertising your blog to your most important audiences on Facebook and Instagram.
You can repeat this step-by-step process each time you publish a new blog post, so you’re always amplifying content and growing your blog quickly, consistently, and at scale.
How to Advertise a Video Blog Instead of an Article
You can follow this same 8-step guide to advertise a video blog on Facebook, too — with only one small change to Step 1: Create an Engagement Campaign.
Previously in Step 1, you selected Engagement as your campaign objective. To amplify a video blog instead of a written post, however, you should select Video Views as your campaign objective.
With Video Views as your Objective, Facebook will put your ads in front of people who are the most likely to watch and engage with video.
Then the rest of Steps 2–8 remain the exact same:
Create a Video Views Campaign In Facebook Ads Manager
Customize Your New Video Views Campaign
Customize Your First Ad Set to Target Buyers and Subscribers
Create Your Ad From An Existing Blog Post
Duplicate Your First Ad Set
Customize Your Second Ad Set to Target Fans and Page Engagers
Duplicate Your Second Ad Set
Customize Your Third Ad Set to Target 1% Lookalikes
TIP Duplicate Your Campaigns.
When you’re ready to advertise your next blog post, you can duplicate this entire campaign to quickly amplify a new piece of content to the same audience.
To duplicate a campaign in Ads Manager:
1. Click the Campaign tab to view all your campaigns.
2. Check the box next to the campaign that you want to duplicate.
3. Select Duplicate from the menu bar.
Then you can edit the ads in the campaign after and select a new existing post to advertise.
Read more about how to duplicate campaigns in this Facebook article.
How To Get More People To Read Your Blog Posts On Social
In Chapter 3, you learned how to advertise your blog posts to hundreds of thousands of new people.
But getting more people to see your content is one thing — getting those people to actually stop and engage with it is quite another.
So next up in Chapter 4, you will learn the ad templates, copy formulas, and advanced social marketing strategies we use to get those people to stop scrolling and actually consume our content.
Chapter 4
How to Increase Post Engagement With Compelling Facebook Ad Creative (Including 7 “Hooks” You Can Copy)
On average, 1,500 posts are available to be in someone’s newsfeed per day, including tons of unsolicited ads that most people just scroll right past.
So how do you get Facebook users to ??stop scrolling, ??consume your messaging, and ??go view your content?
You have to “sell the click”.
This is the artform of knowing how to make your ad stand out so it grabs people’s attention and motivates them to take action.
When you know how to do this right, it puts you miles ahead of other advertisers and content creators.
And when it comes to selling the click, it’s all about the ad creative.
What is Facebook Ad Creative?
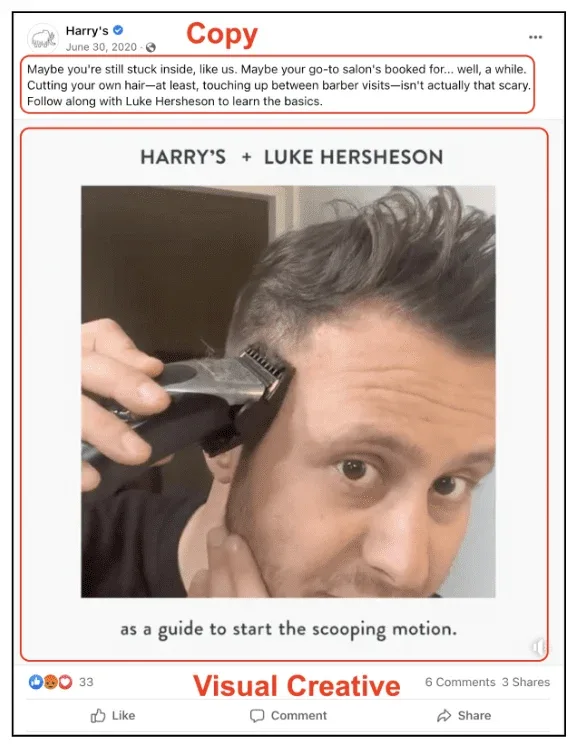
On Facebook, your ad creative consists of your:
Visual Asset: This can be a video, image or GIF. It’s usually the first part of your ad a prospect sees, so it’s essential you get this right. (Don’t worry, I’ll show you how!)
Copy Asset: This includes the post copy above your visual creative and the call to action, if you have one.
What Makes Compelling Facebook Ad Creative?
As I said above, people see a lot of posts on Facebook every day, and the quality of your ad creative is the difference between people stopping to consume your content or scrolling right by.
But is there really something that all good ads share? Yes!
They all have a strong hook.
Your Facebook Ad Creative Should Have a Strong Hook
When it comes to Facebook ads, your hook is everything.
Your hook is the way you frame your content through your visual creative and your copy. These are tried-and-true formulas for making posts interesting, exciting and accessible.
Think of it like a movie genre.
Say you want to tell a love story: you could do that through comedy (When Harry Met Sally), sci-fi (The Matrix), even horror (Dracula).
Based on their genre, these stories follow different conventions and appeal to different people. The same goes for your hooks.
There are 1,000s of hooks you can use to frame your content. Here are a few of my favorites.
Facebook Ad Templates: 7 Creative “Hooks” to Increase Engagement
I want you to leave this post with proven templates that you can use right away to win with content amplification.
Unfortunately, it’s not as simple as me saying, “Hey, just use my same exact copy and visual creative in your ads!” as we are promoting different content to different audiences.
What I can do for you, though, is give you 7 hooks you can customize to fit your posts, including examples and fill-in-the-blank templates to make it easy.
(These hooks even work for product ads, too!)
Okay, here we go.
(Hook #1) Problem / Solution
TEMPLATE: [DO THIS] and [GET, LEARN, UNDERSTAND BENEFIT].
This is one of the most effective hooks for any ad, email, or piece of content that looks to drive action.
First, you frame your content around a pain point that your audience is experiencing, and then you offer a way to relieve it.
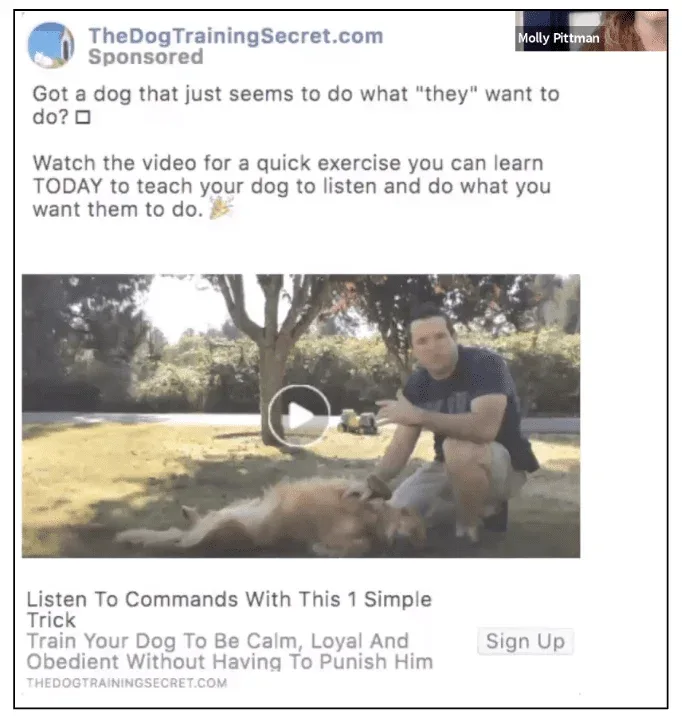
EXAMPLE: THE DOG TRAINING SECRET
This post speaks to pet owners who are having a problem with their dogs being disobedient.
As a solution, the ad promises to teach these pet owners a quick exercise that will get their dogs to listen to them.
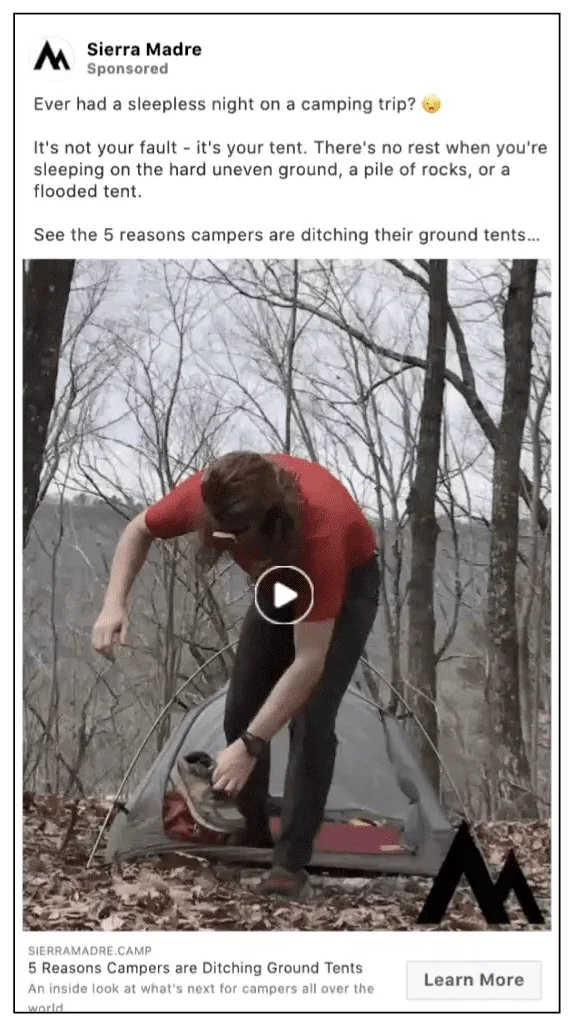
EXAMPLE: SIERRA MADRE
This ad from Sierra Madre is directed toward people who are having a problem with sleepless nights while camping.
It then offers a solution hidden within their piece of content, “5 reasons campers are ditching their ground tents…”
This ad also uses a framing device that I really like: they say, “It’s not your fault,” it’s someone or something else’s. People love hearing that!
Does your content help solve a pain point that’s common within your community?
If so, this could be a great hook for your ad.
(Hook #2) Tell A Story
TEMPLATE: “[TELL A STORY]. Can you relate? If so, [DO THIS] and [EXPERIENCE SIMILAR BENEFIT].”
Stories are a common thread across all popular entertainment, including TV, movies and social media — which is probably why the average American consumes 7 hours of screen time every day.
Stories are a natural way for us to make sense of ourselves and our world, and to relate to others’ experiences.
This also makes them effective tools for marketers who want to build relationships with their customers.
But what makes a good story? Don’t worry, it’s easier than it sounds.
A good story tends to:
Have a beginning, middle and end.
Make a point (a punchline, a moral, a surprise, etc.)
Evoke emotion, like joy, sadness, or inspiration.
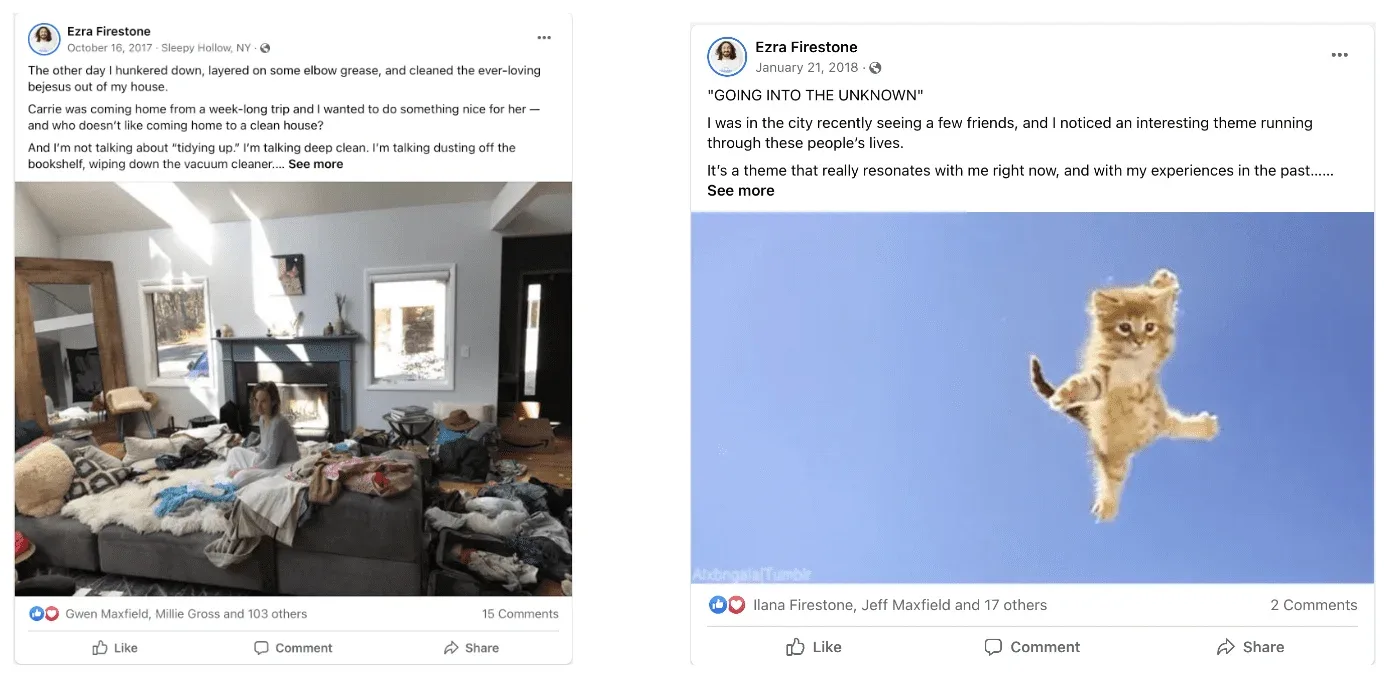
EXAMPLE: EZRA FIRESTONE
Hey, that’s me!
I really like using story-based hooks in my content amplification posts. Here are a couple of examples:
Notice the language I use to start these posts: “The other day…” and “I was in the city recently”…
It doesn’t take an expert to realize that these are the beginnings of stories! And this language pulls the reader in because they want to hear what happens.
Story-based ads are super effective if you can tell a story that’s relevant to the content you’re promoting. It also helps if you or someone on your team is a good storyteller, but that’s a skill that comes with practice!
(Note: Unlike most of the ads in this chapter, these posts are also the content. I amplify these to keep my audience engaged, and they don’t link to separate videos or articles.)
(Hook #3) Logic
TEMPLATE: “[FACT RELEVANT TO YOUR AUDIENCE]. Overcome [THIS PROBLEM] using the advice in [YOUR CONTENT].”
Different people are motivated by different things.
In copywriting, one commonly used motivator is logic. This tactic appeals to someone’s rationality, as opposed to their emotions or desires.
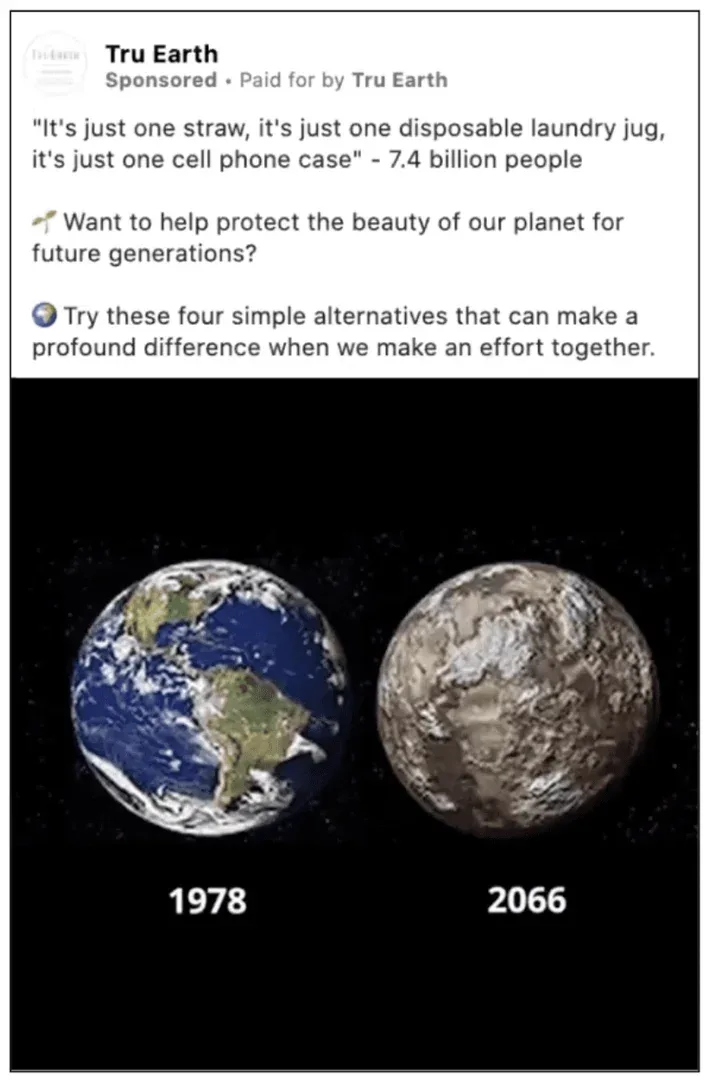
EXAMPLE: TRUEARTH
In this ad, Tru Earth takes a common idea — that something small like a plastic straw can’t significantly impact pollution — and uses logic to flip that assumption on its head.
The ad points out that everyone on the planet is saying the same thing, and while one straw might not be a big deal, 7.4 billion most definitely are!
It then uses striking visual creative to show what will happen to the planet if we don’t adopt this new, logical way of thinking.
This ad could have easily appealed to someone’s sentimentality (“Think of the children!”), but it uses logic instead.
Neither is better or worse — it depends on the audience.
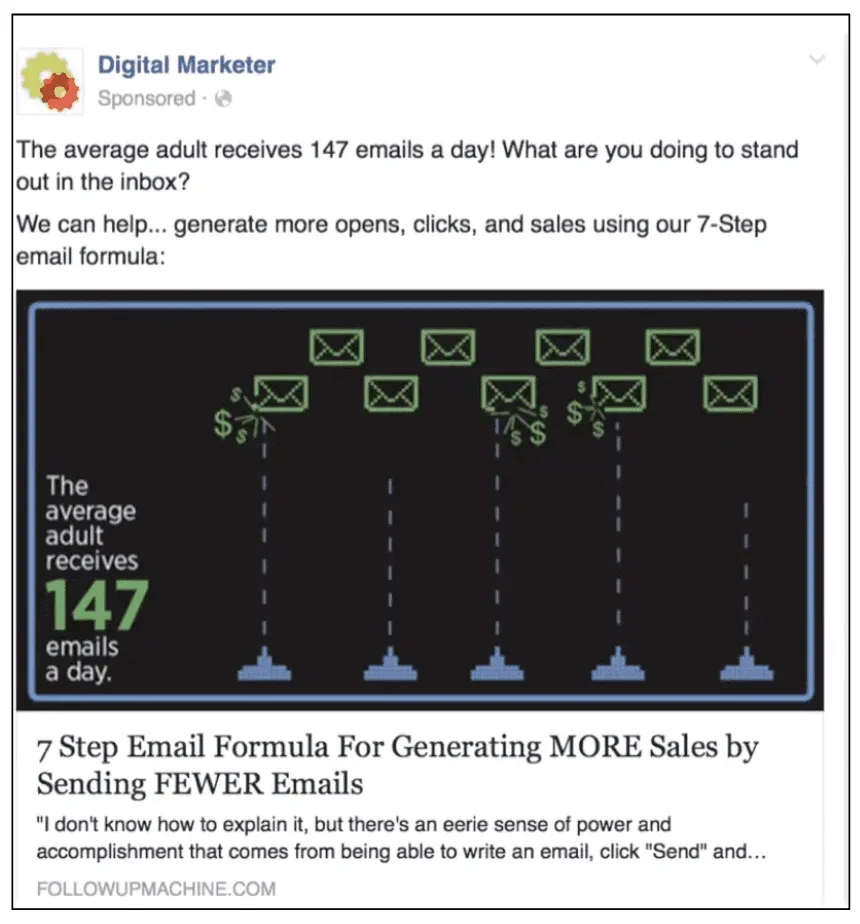
EXAMPLE: DIGITALMARKETER
This next example from DigitalMarketer also appeals to logic.
They point out that the average person receives 147 emails a day, which means marketers need to do something extra if they’re going to stand out in their subscribers’ inboxes.
That’s why the reader should consume this post containing DM’s 7-step email formula:
Do you think your audience would respond to logic? Does your content make a strong point that might influence them?
Then give this hook a try!
(Hook #4) Educate
TEMPLATE: “Did you know [FACT RELEVANT TO A GOAL OR PAIN POINT]? Learn more in [YOUR CONTENT].”
Just as people like to hear stories, they also like to learn things.
This hook starts out by introducing an idea that the reader probably doesn’t know much about, then expands on that idea in their content.
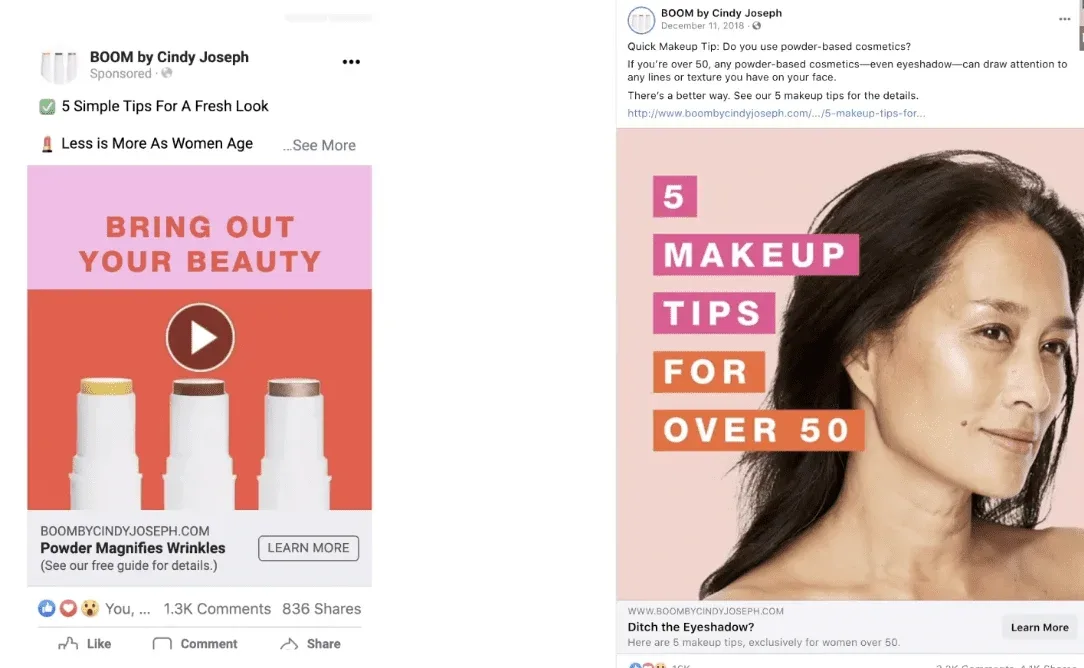
EXAMPLE: BOOM! BY CINDY JOSEPH
BOOM! is my $155 million Shopify brand that I built from the ground up using the same strategies in this post.
This ad copy opens with the question, “Do you use powder-based cosmetics?”, which we know most of our readers do.
This is an example of a “yes” question: a question you’re confident the reader will say yes to so they’ll know the ad is relevant to them.
(Warning: you have to be careful about what you say about the people you’re targeting, as I explain in the tip below.)
The ad goes on to explain why powder-based cosmetics are actually bad, then educates the reader on better alternatives in our article, “5 Makeup Tips for Over 50.”
TIP: Be careful when calling out personal attributes.
While it’s effective to help your audience self-select by calling out something you know about them, you have to be careful about what you call out.
Facebook’s policy states that “Ads must not contain content that asserts or implies personal attributes. This includes direct or indirect assertions or implications about a person’s race, ethnicity, religion, beliefs, age, sexual orientation or practices, gender identity…”
Violating this policy can land you in serious hot water, resulting in unapproved ads and even an account ban.
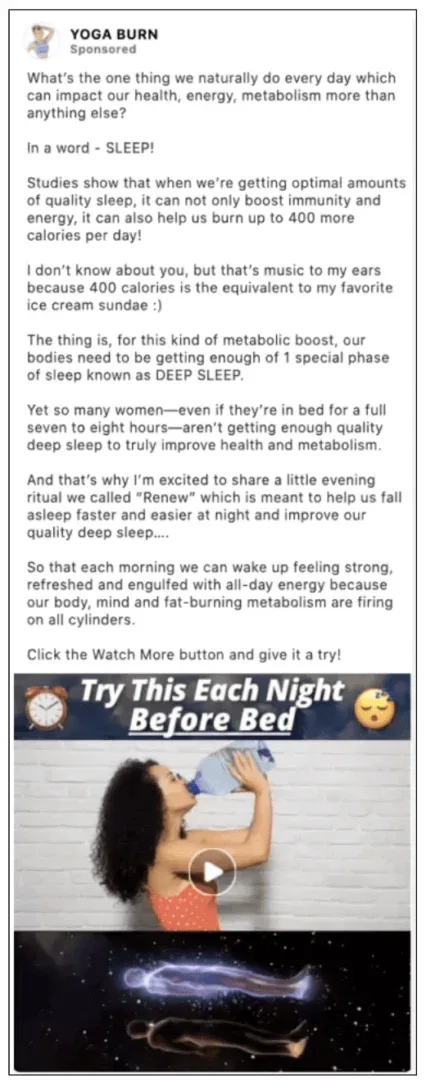
This post educates the reader on the importance of sleep, why women (the brand’s target audience) don’t get enough of it, and how that impacts their health.
Then in the video, it talks about their Renew system that promises to help improve sleep.
I love how the copy opens with a question that’s relevant to the topic of the ad while still educating the reader.
It then uses study-backed info to support its claims. Nice!
When using the education hook, it helps to site an authority — an expert in the field, documented research, etc. — to back up what you’re saying.
(Hook #5) “Making This Mistake?”
TEMPLATE: “Are you making [THIS MISTAKE]? Use [THIS ALTERNATIVE] and experience [THIS BENEFIT].”
A relative of the education angle, this hook highlights a mistake the reader might be making and gives them a way to fix it by consuming the content.
EXAMPLE: BOOM! BY CINDY JOSEPH
This ad opens with, “Still using the same old makeup routine from your 20s?”
While we don’t explicitly say this is a mistake, the copy (“same old makeup routine”) and the shocked emoji get the point across!
We then offer a way for the reader to fix this mistake by consuming our content, “5 Makeup Tips for Older Women”.
(Hook #6) Relevant
TEMPLATE: “Because of [THIS MOMENT IN TIME], you should take [THIS ACTION].”
Use this hook to frame your content as something new and timely — and therefore as something that should be consumed right now — by connecting it to current events that matter to your audience.
Because this hook relies on timeliness, these posts have a shorter shelf life and aren’t often used in evergreen Facebook campaigns.
But they’re perfect for content amplification ads that you run when releasing new content.
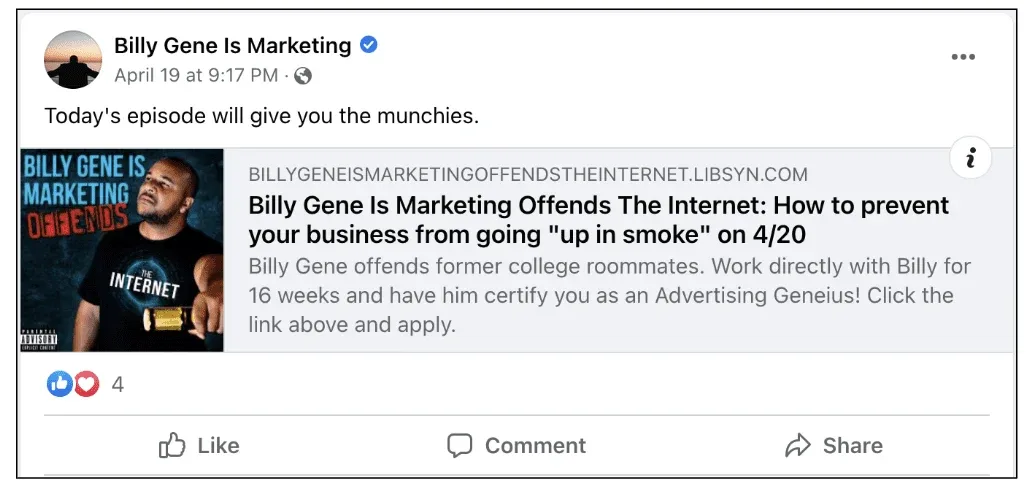
EXAMPLE: BILLY GENE IS MARKETING
In this example, Billy Gene is taking advantage of a weed smoking holiday, April 20, to promote his content on April 19.
He uses language familiar to smokers, saying the episode will “give you the munchies” and help your business from going “up in smoke”.
It’s important to note that the article has nothing to do with weed — it’s about how to help grow your business. But by framing the post around this holiday, he makes the content seem more relevant.
(Hook #7) Go Against The Grain
TEMPLATE: “While most people [THINK / DO THIS], I [THINK / DO THE OPPOSITE], and here’s why.”
When creating and amplifying content, it helps to have opinions.
Some businesses don’t want to take sides on an issue because they don’t want to alienate potential members of their audience.
And maybe they don’t alienate anyone — but they don’t attract anyone, either.
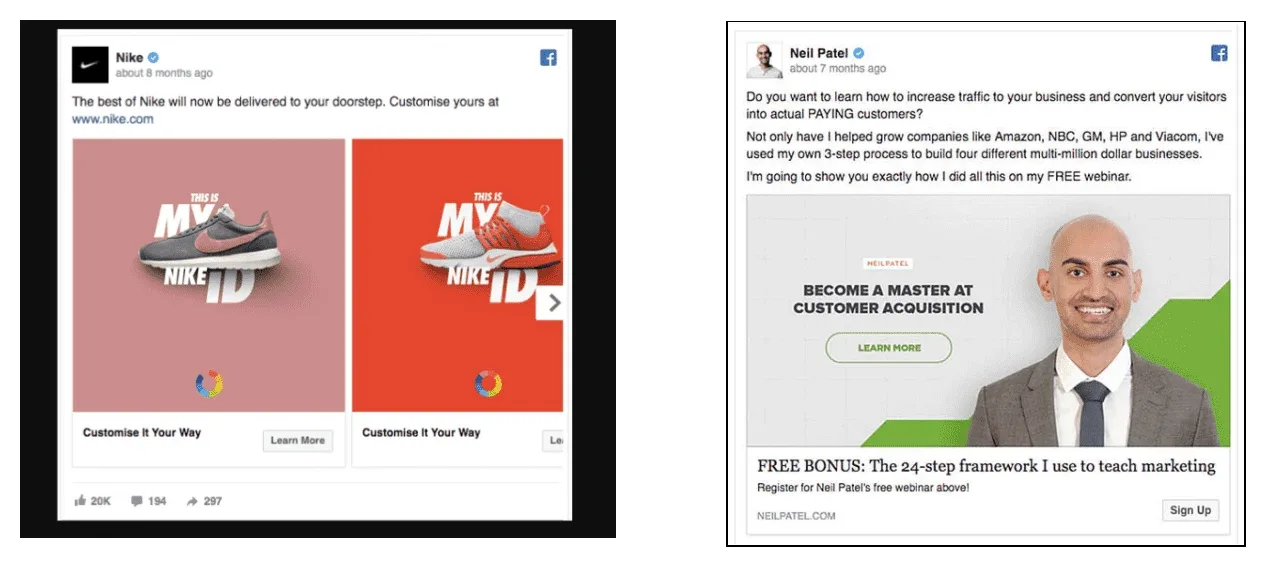
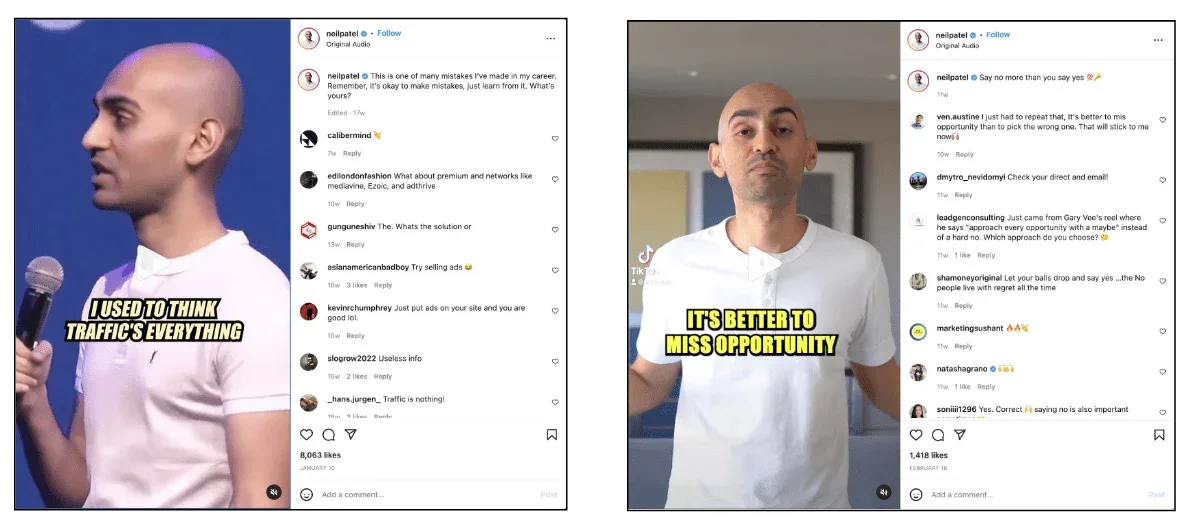
EXAMPLE: NEIL PATEL
In the first example (left), Neil Patel says, “I used to think traffic’s everything”.
And since traffic is one of the most popular topics in marketing, when people see this they probably think, “Wait… It’s not? Tell me more!”
That’s the power of going against the grain.
This is similar to the “#5 Are you making this mistake?” hook, with a little “#2 Tell a story” thrown in, since it implies he’s going to explain why he changed his mind about traffic.
One thing’s for sure: people who see this want to hear what he has to say!
In the next example (right), Neil says, “It’s better to miss opportunity”.
By definition, opportunity is something you don’t want to miss, right? That contradiction is what makes this an intriguing hook.
Does your content feature an opinion that’s uncommon or controversial in your community? Consider using this hook to frame your amplification post around that position.
Decide How to Present that Hook Visually
Once you choose a hook, you need to decide how to represent that hook visually in your ad.
But there are endless options of how you can represent your hook, so start by choosing the visual format, visual style, and specific imagery you want to use.
Choose the Format of Your Visual Creative
Here are the visual formats you can use in your content amplification post:
Video (Long-form or Short-form)
GIF
Static Image
Usually, the type of content you are amplifying will inform the visual format you use.
If you’re promoting a piece from your vlog, say, then consider using a snippet from the video as your creative. You can even improve the quality and effectiveness by adding captions!
If you’re promoting an article or podcast that has no video element built in, images and GIFs work really well.
Choose Your Visual Style
Broadly speaking, when creating an ad you choose between 2 visual styles: native and non-native.
Native Ads
Native ads are Facebook ads that don’t look like ads. They look like regular posts you might see from a friend.
Facebook cares about the experience of their users, and they know people don’t like getting bombarded with ads. That’s why Facebook has been favoring ads with a native visual style (which also tend to draw more engagement).
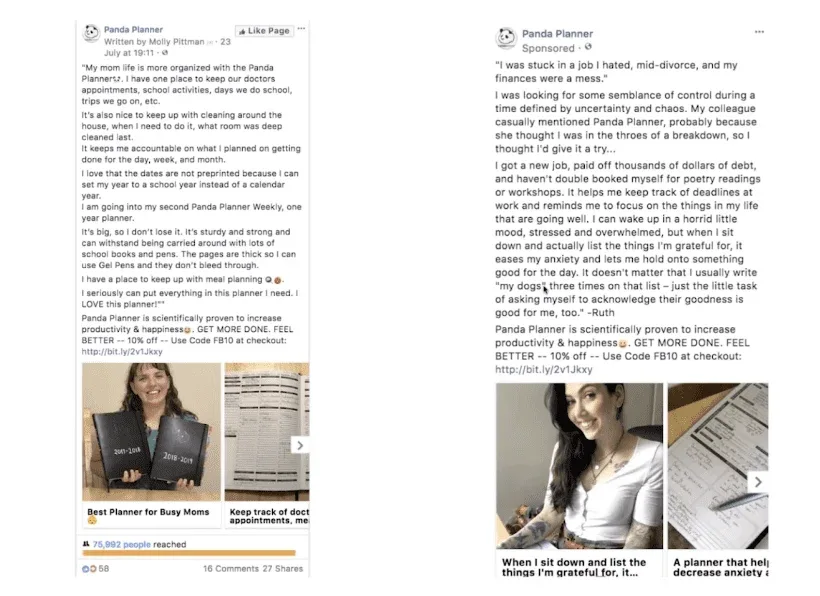
These ads from Panda Planner avoid fancy design or strong calls to actions.
Instead, they use real people with a natural aesthetic that you might see from anyone else on your timeline.
Non-native Ads
These are ads that do look like ads.
It’s obviously a business trying to get you to do something, whether that’s to consume their content, join their email list, or buy their product.
And while Facebook does seem to favor native ads lately, what’s important is that your ad fits your brand and your content. So if a non-native visual style best serves the hook of your ad, just go with it.
Non-native ads also open up a variety of things you can use to draw the viewer in, like colorful graphics, eye catching effects and stronger CTAs.
Choose the Specific Images for Your Ad
Okay, so you have your hook and you have the visual style you want to use.
Now, it’s time to decide exactly what images you are going to include in the video, GIF or static image in your post.
Maybe what works best for your brand is just to speak plainly face-to-camera, and if so, then that’s great! But if you want to get more creative with your visual asset, then this is where you have to flex your brain muscle.
As the old Hollywood saying goes, “Show, don’t tell.”
Try to think of things you can use to express the hook visually — things like your outfit, props, the location where you’re filming, or what you’re physically doing in the video.
The same goes for GIFs and static images: how can you best express your hook visually while connecting it to your content?
TIP: Don’t Use Generic Imagery
Whether you decide on native or non-native visual style, please avoid using generic imagery.
Sometimes, people get so caught up in hacks and best practices that they forget the #1 rule when it comes to Facebook ad creative: it needs to be relevant to the content you’re amplifying.
For example: cute animals are good at drawing attention to your ads. But if you put one in your ad and it has nothing to do with the content you’re amplifying, people could get upset.
They won’t consume your messaging and they might even flag you on Facebook for being misleading.
Copywriting Tips for Compelling Facebook Ad Creative
In this chapter, we’ve mostly focused on visual creative
Now let’s pivot to the written assets where I’ll give a copy structure template, as well as 3 copywriting best practices to help you get started.
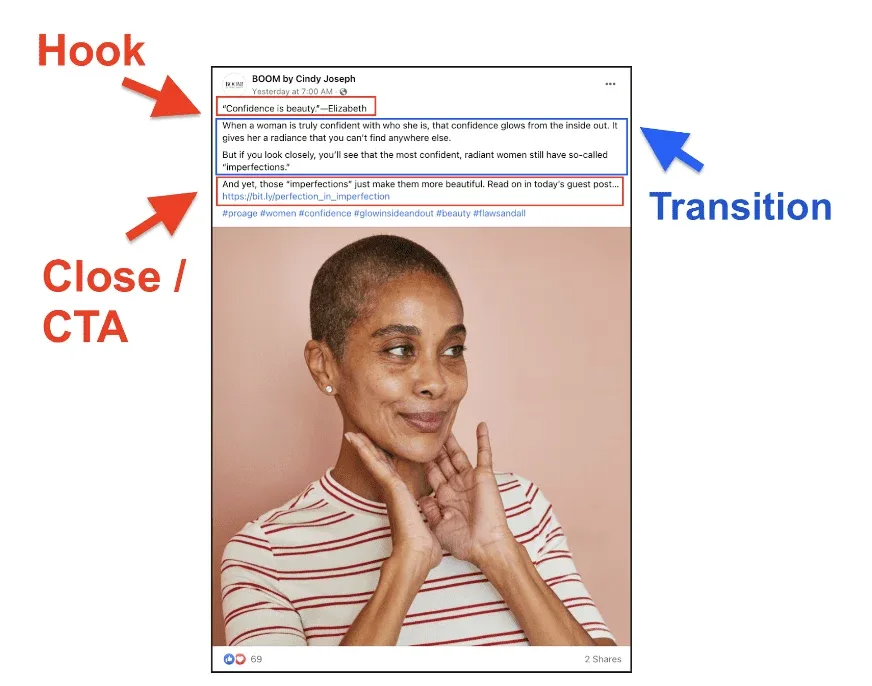
Copy Structure
Most copy follows a basic structure: Open, transition, call to action.
Open
The goal of your opening is to get people to stop scrolling and give you their attention. Do this by expressing your hook in a clear and concise sentence.
If you’re using the “Problem / Solution” hook, you probably want to start by addressing the reader’s pain point. If you’re using the “Educational” hook, maybe you start with a question or an interesting fact.
Transition
This section is all about keeping attention and generating interest in your content.
Do that by expanding on your hook to connect it to the piece of content you are amplifying. Tell them why they should be interested in your post, but if you want the person to click over to your content, make sure to keep them wanting more.
Call to Action
What is the next step you want the viewer to take?
Is there a blog post or podcast episode you want them to click over to? If so, add a short link at the bottom, and don’t just expect them to click on it — tell them to.
And even if your entire piece of content lives in the Facebook post, still give them something to do next, whether that’s clicking over to your blog for more content or commenting on the post.
The example above opens with “Confidence is beauty”, using the “Against the Grain” hook to say that — despite popular opinion — there aren’t objective traits that make someone attractive. According to this ad, beauty comes from confidence.
In the transition, the copy expands on that idea and gives the reader a preview of what is in the post.
Then in the close, as a call to action it says “Read on in today’s guest post.”
In a few short sentences, this ad copy grabs the reader’s attention, generates interest in the content and gives them a place to consume it.
3 Ad Copy Best Practices
There’s no right or wrong way to write ad copy.
Different audiences respond to different styles, so it’s important you test to find out what works for you.
Still, here are 3 best practices to help you start writing copy creative for your content amplification posts:
Make your copy easy on the eyes by using short paragraphs and sentences.
Experiment with short-form and long-form copy (we use both when running ad sets with multiple ads).
You don’t always need to write like a professional copywriter. Depending on your brand voice, casual writing works very well!
Chapter 4 Summary
In this chapter, you learned why the success of your content amplification post relies so heavily on your ad creative.
Now here’s your action item: go use these 7 hooks to create compelling visual and copy assets for your ads!
Conclusion (And How to Create Great Content Every Week)
I hope you found this guide to Content Amplification useful.
If you follow the instructions I laid out in these four chapters, you can run content amplification for any brand — no matter its size, product, or industry.
How to Create New Content Every Week for Content Amplification
Content amplification is a crucial step in your content marketing strategy, but it’s only the last in a 5-step process.
First, you need a piece of content to amplify.
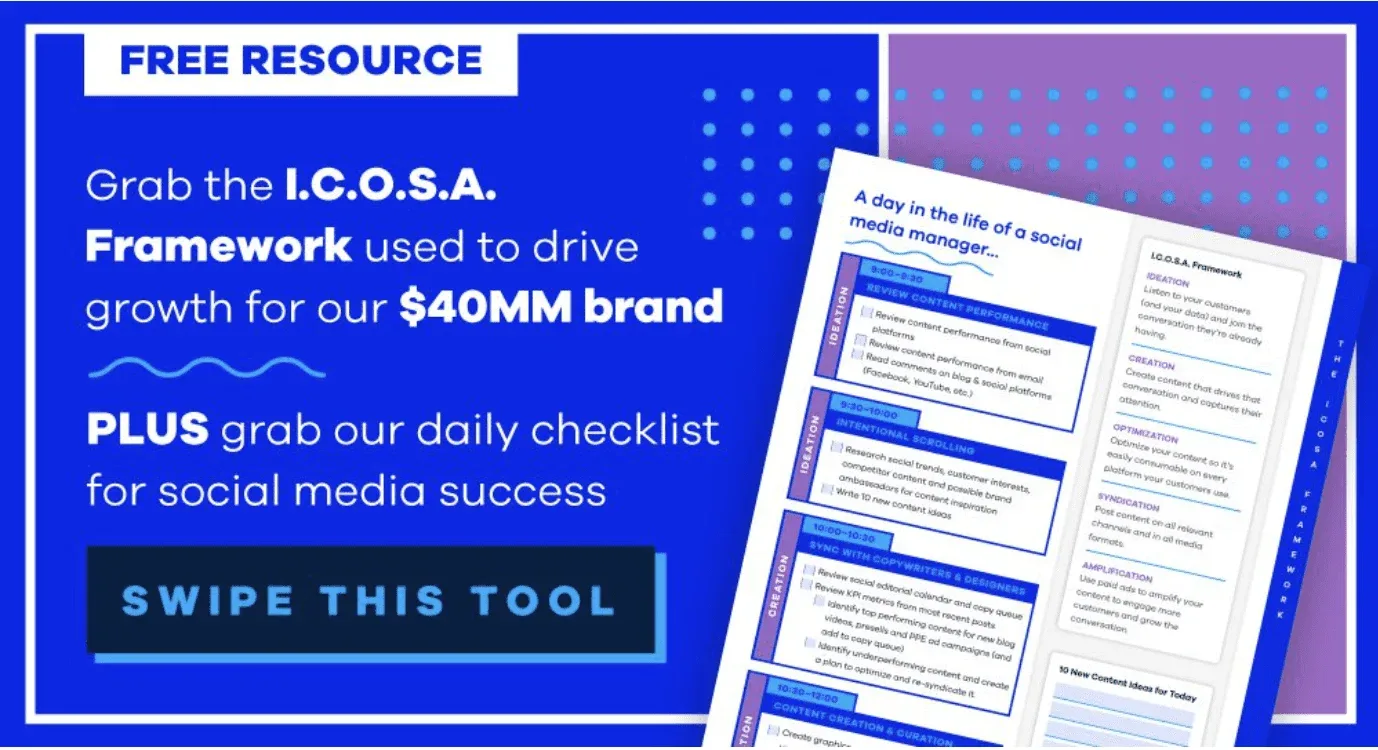
If you want to go deeper and learn how to create content for social media, then here’s another resource to check out next: The I.C.O.S.A. Framework.
This download explains all 5 steps of my content marketing strategy:
Ideation
Creation
Optimization
Syndication
Amplification
And it’s how my social media manager generates a never-ending supply of content ideas for us to amplify every week.
You can grab the I.C.O.S.A. resource for free here:
Smart marketing. Right to your email.
Get the latest marketing news, hot tips, and lifestyle advice delivered to your inbox.
Smart Marketer will not sell or spam your email, you can opt-out at any time.